This article describes how to serve a WordPress application from Amazon Web Service’s Elastic Beanstalk, using Amazon RDS for the MySQL database and S3 for static media files. The hope is that this article is accessible to a large audience, though it assumes the following:
Click on the icons to view screenshots of related steps.
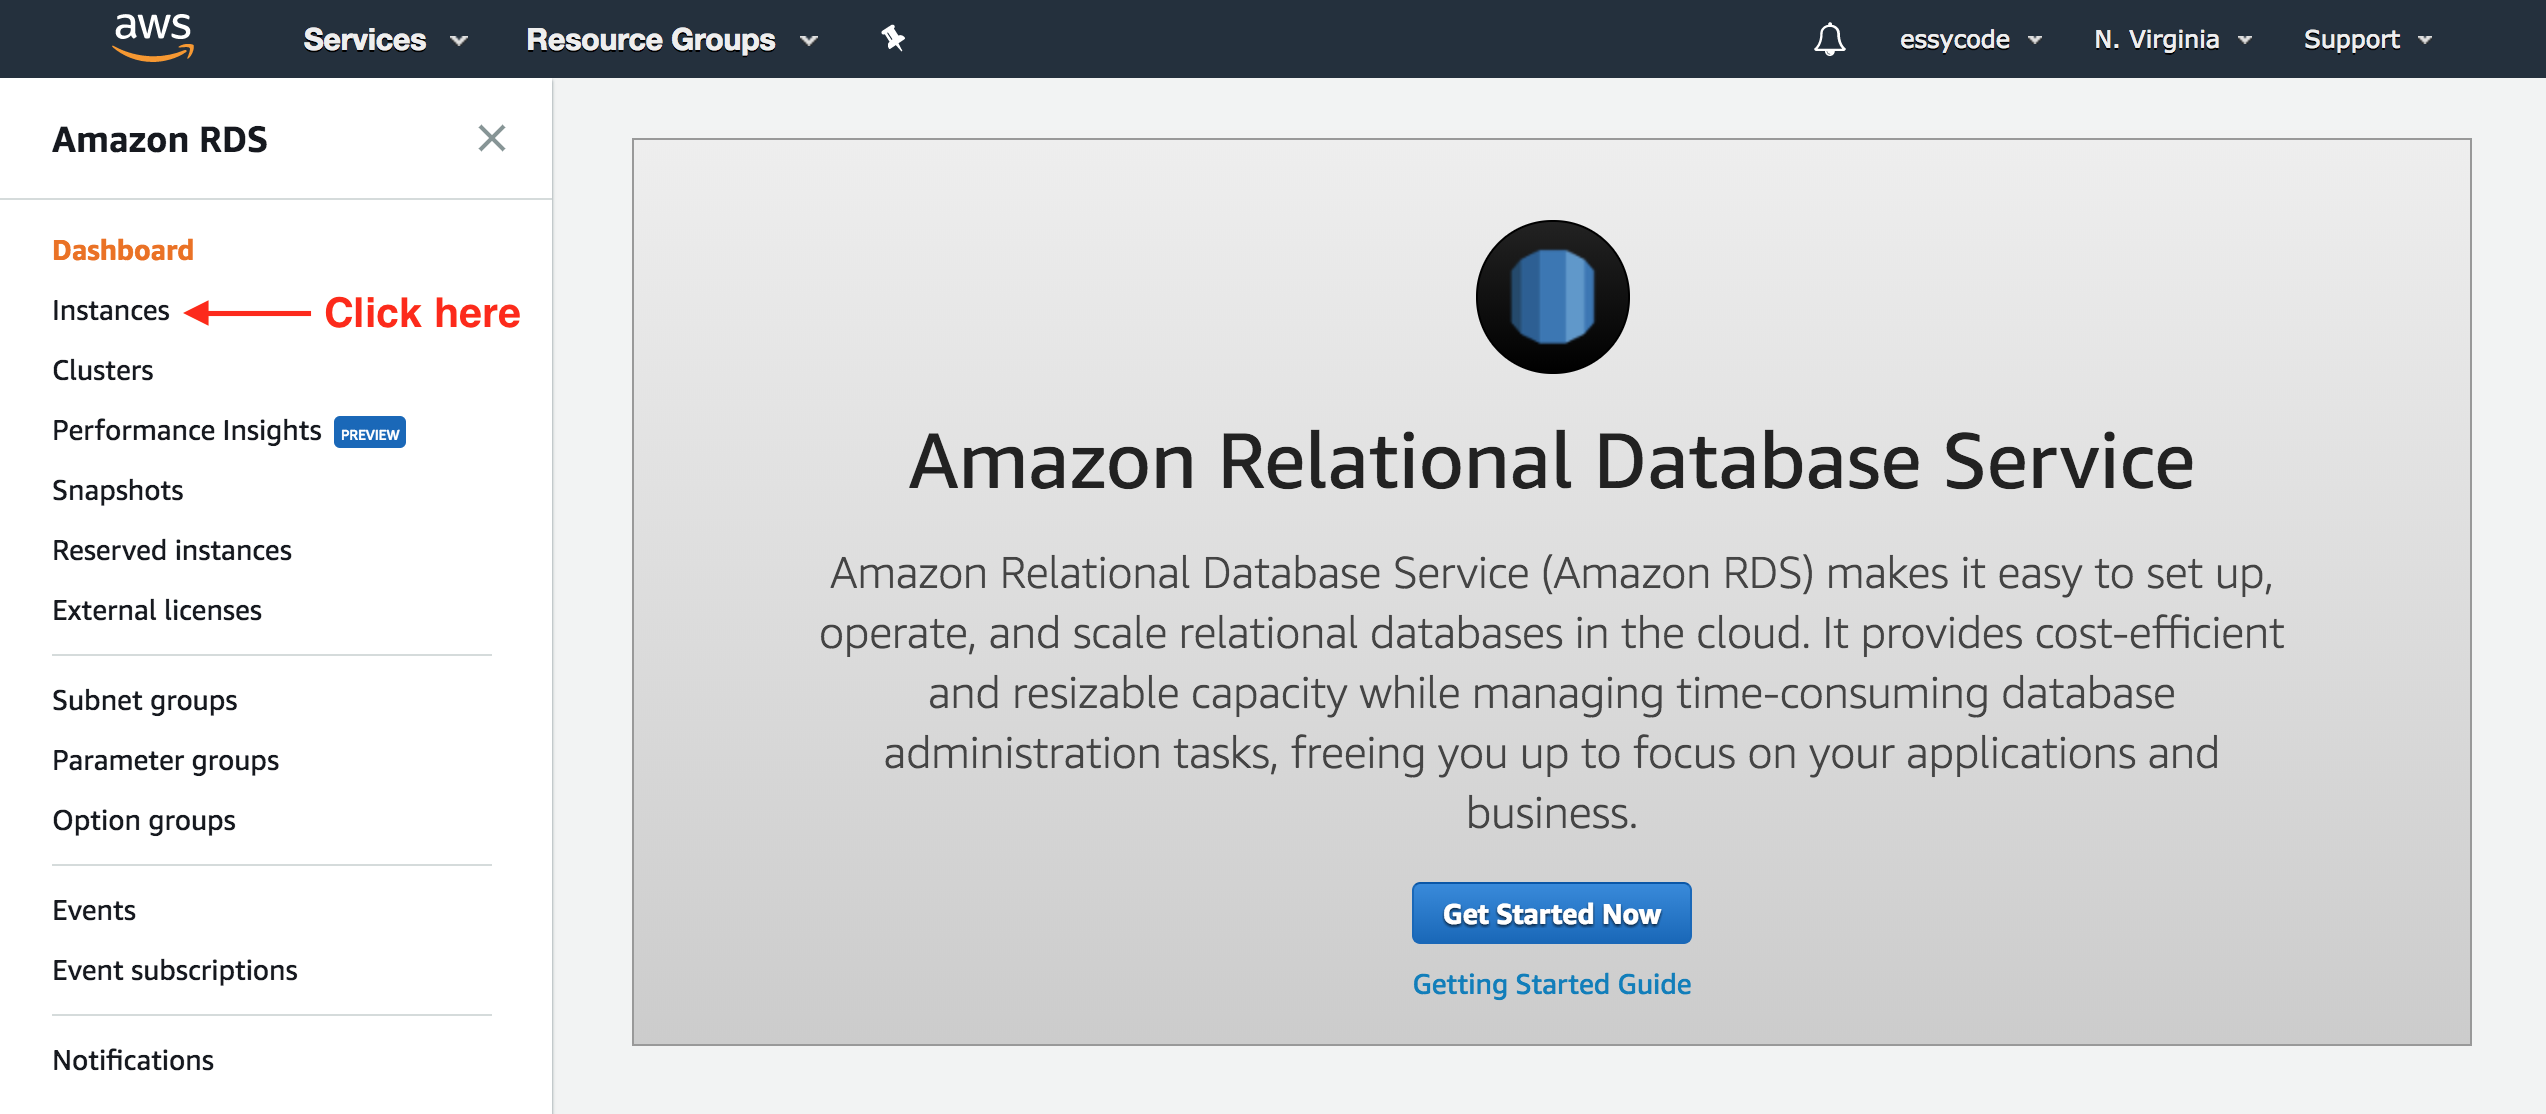
WordPress requires a MySQL database that we’ll create using Amazon RDS. While it’s possible to create a database as part of an Elastic Beanstalk instance, creating our own standalone RDS instance offers greater flexibility and means data won’t be lost if we terminate our Elastic Beanstalk instance.
Open the RDS dashboard, click “Instances” in the menu on the left , and click the “Launch DB instance” button . You will be guided through four configuration pages detailed below.
Choose “MySQL” and click the “Next” button.
Choose “Production – MySQL” and click the “Next” button.
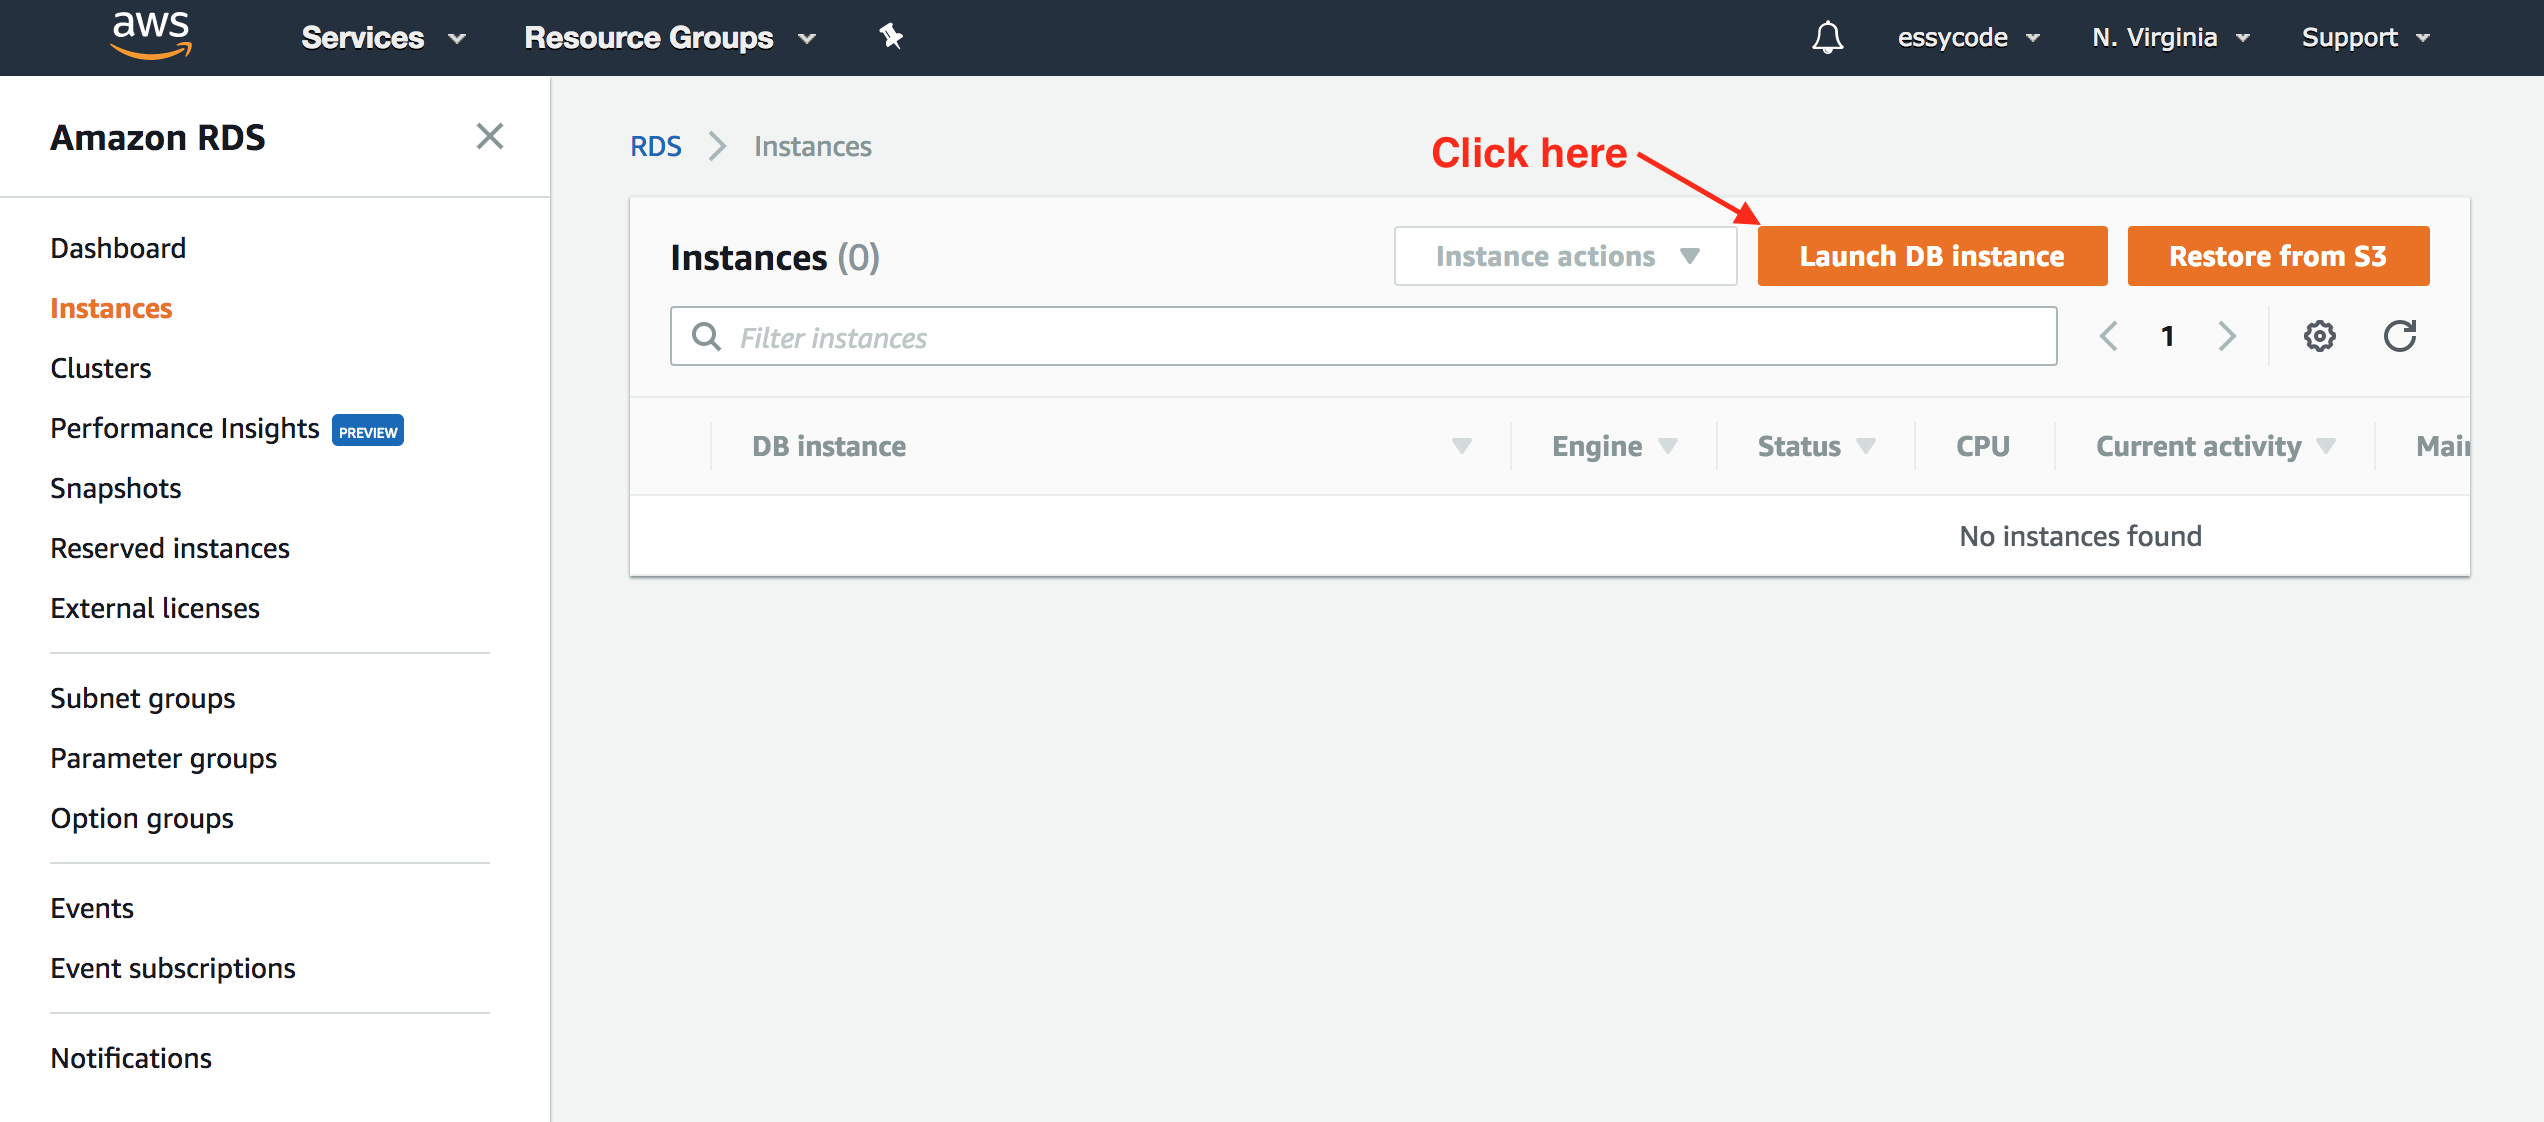
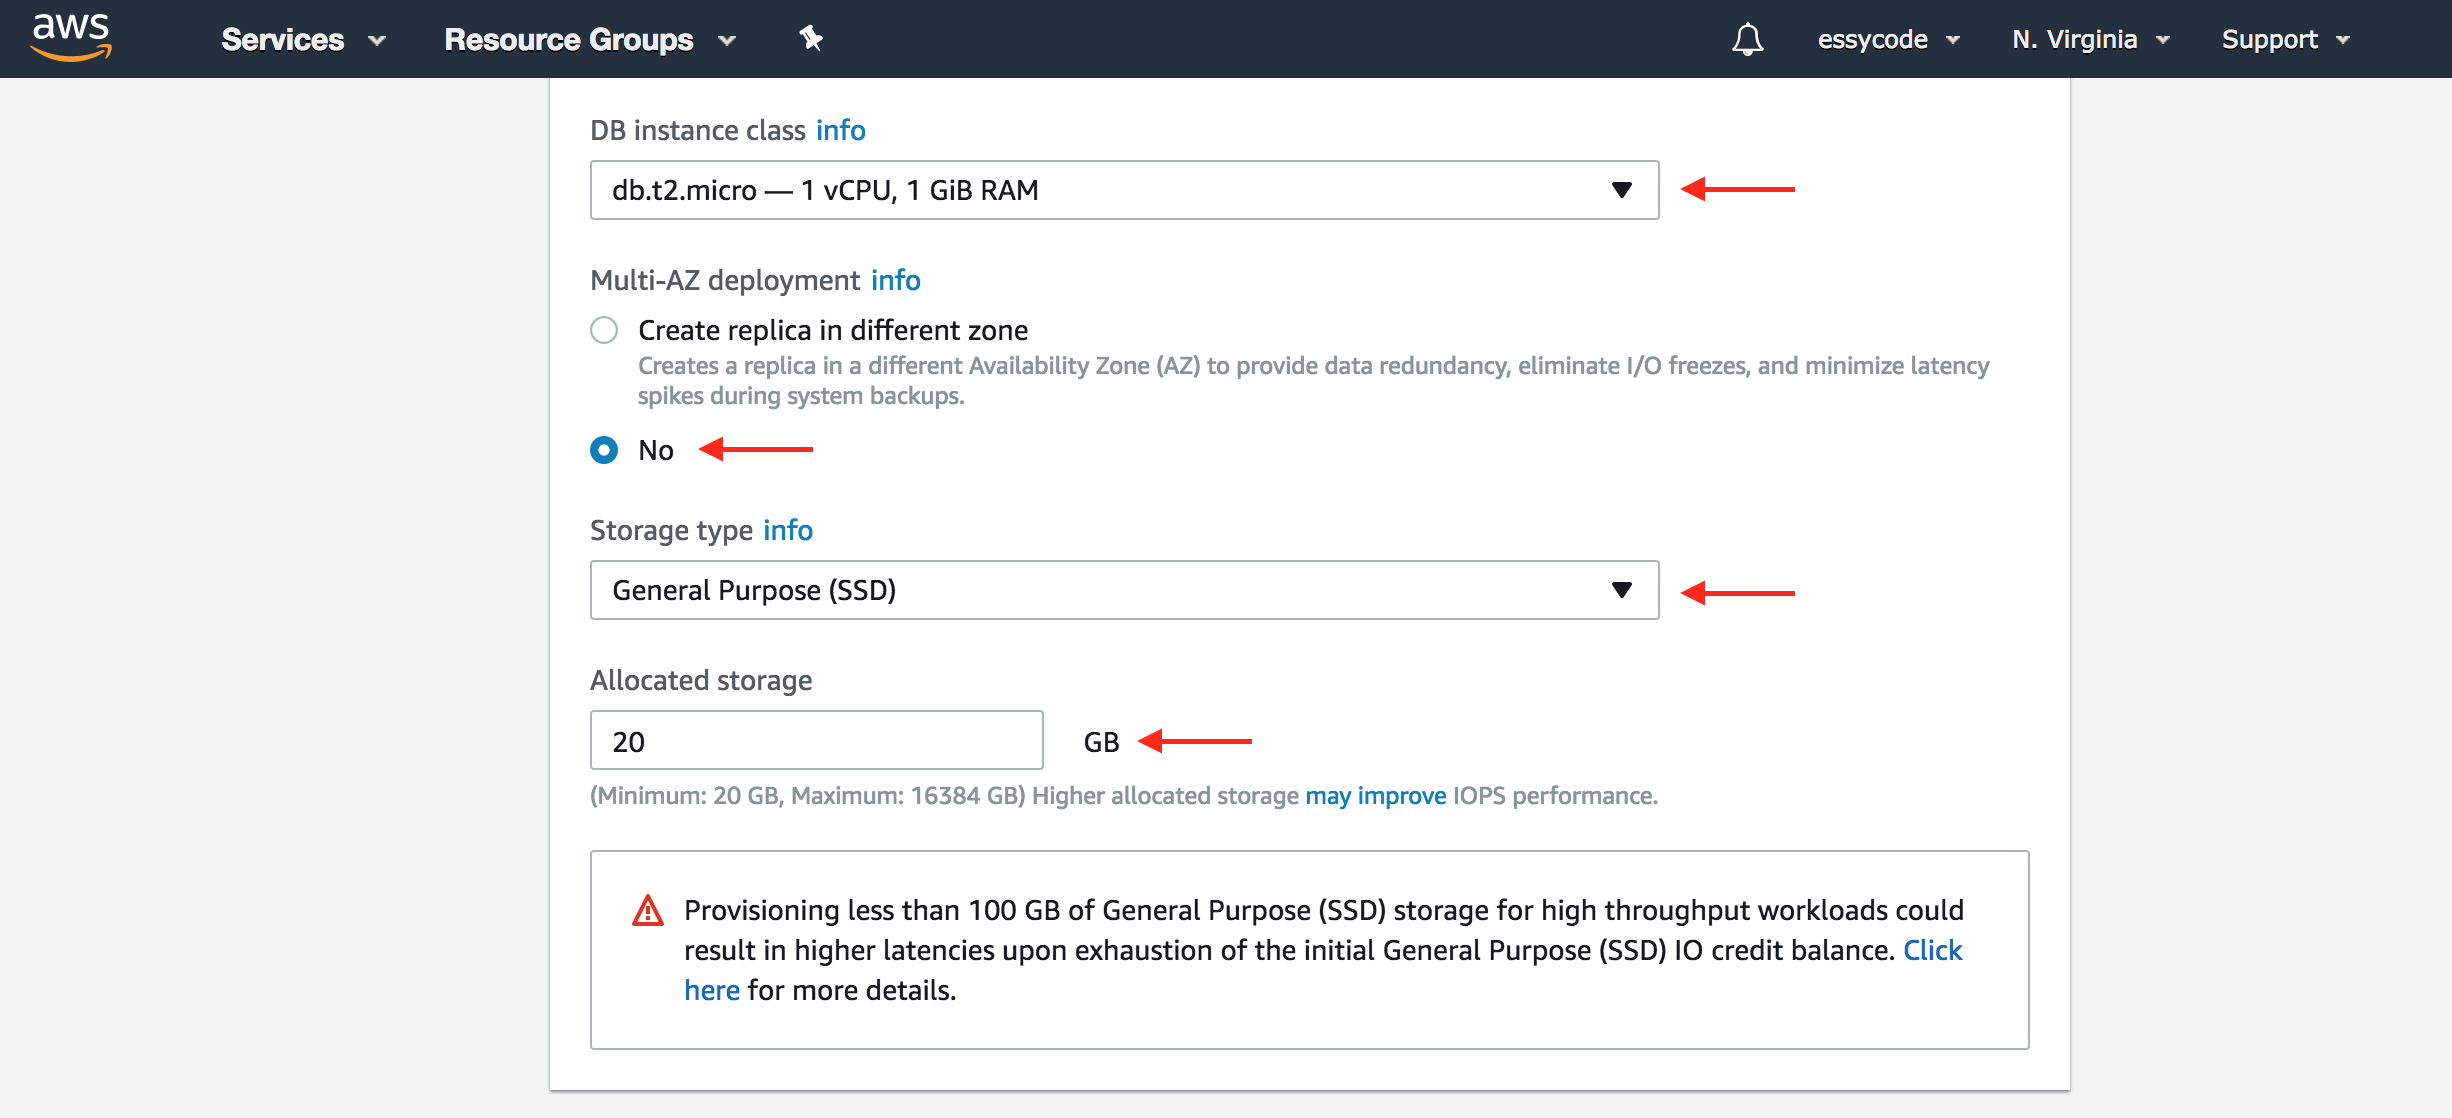
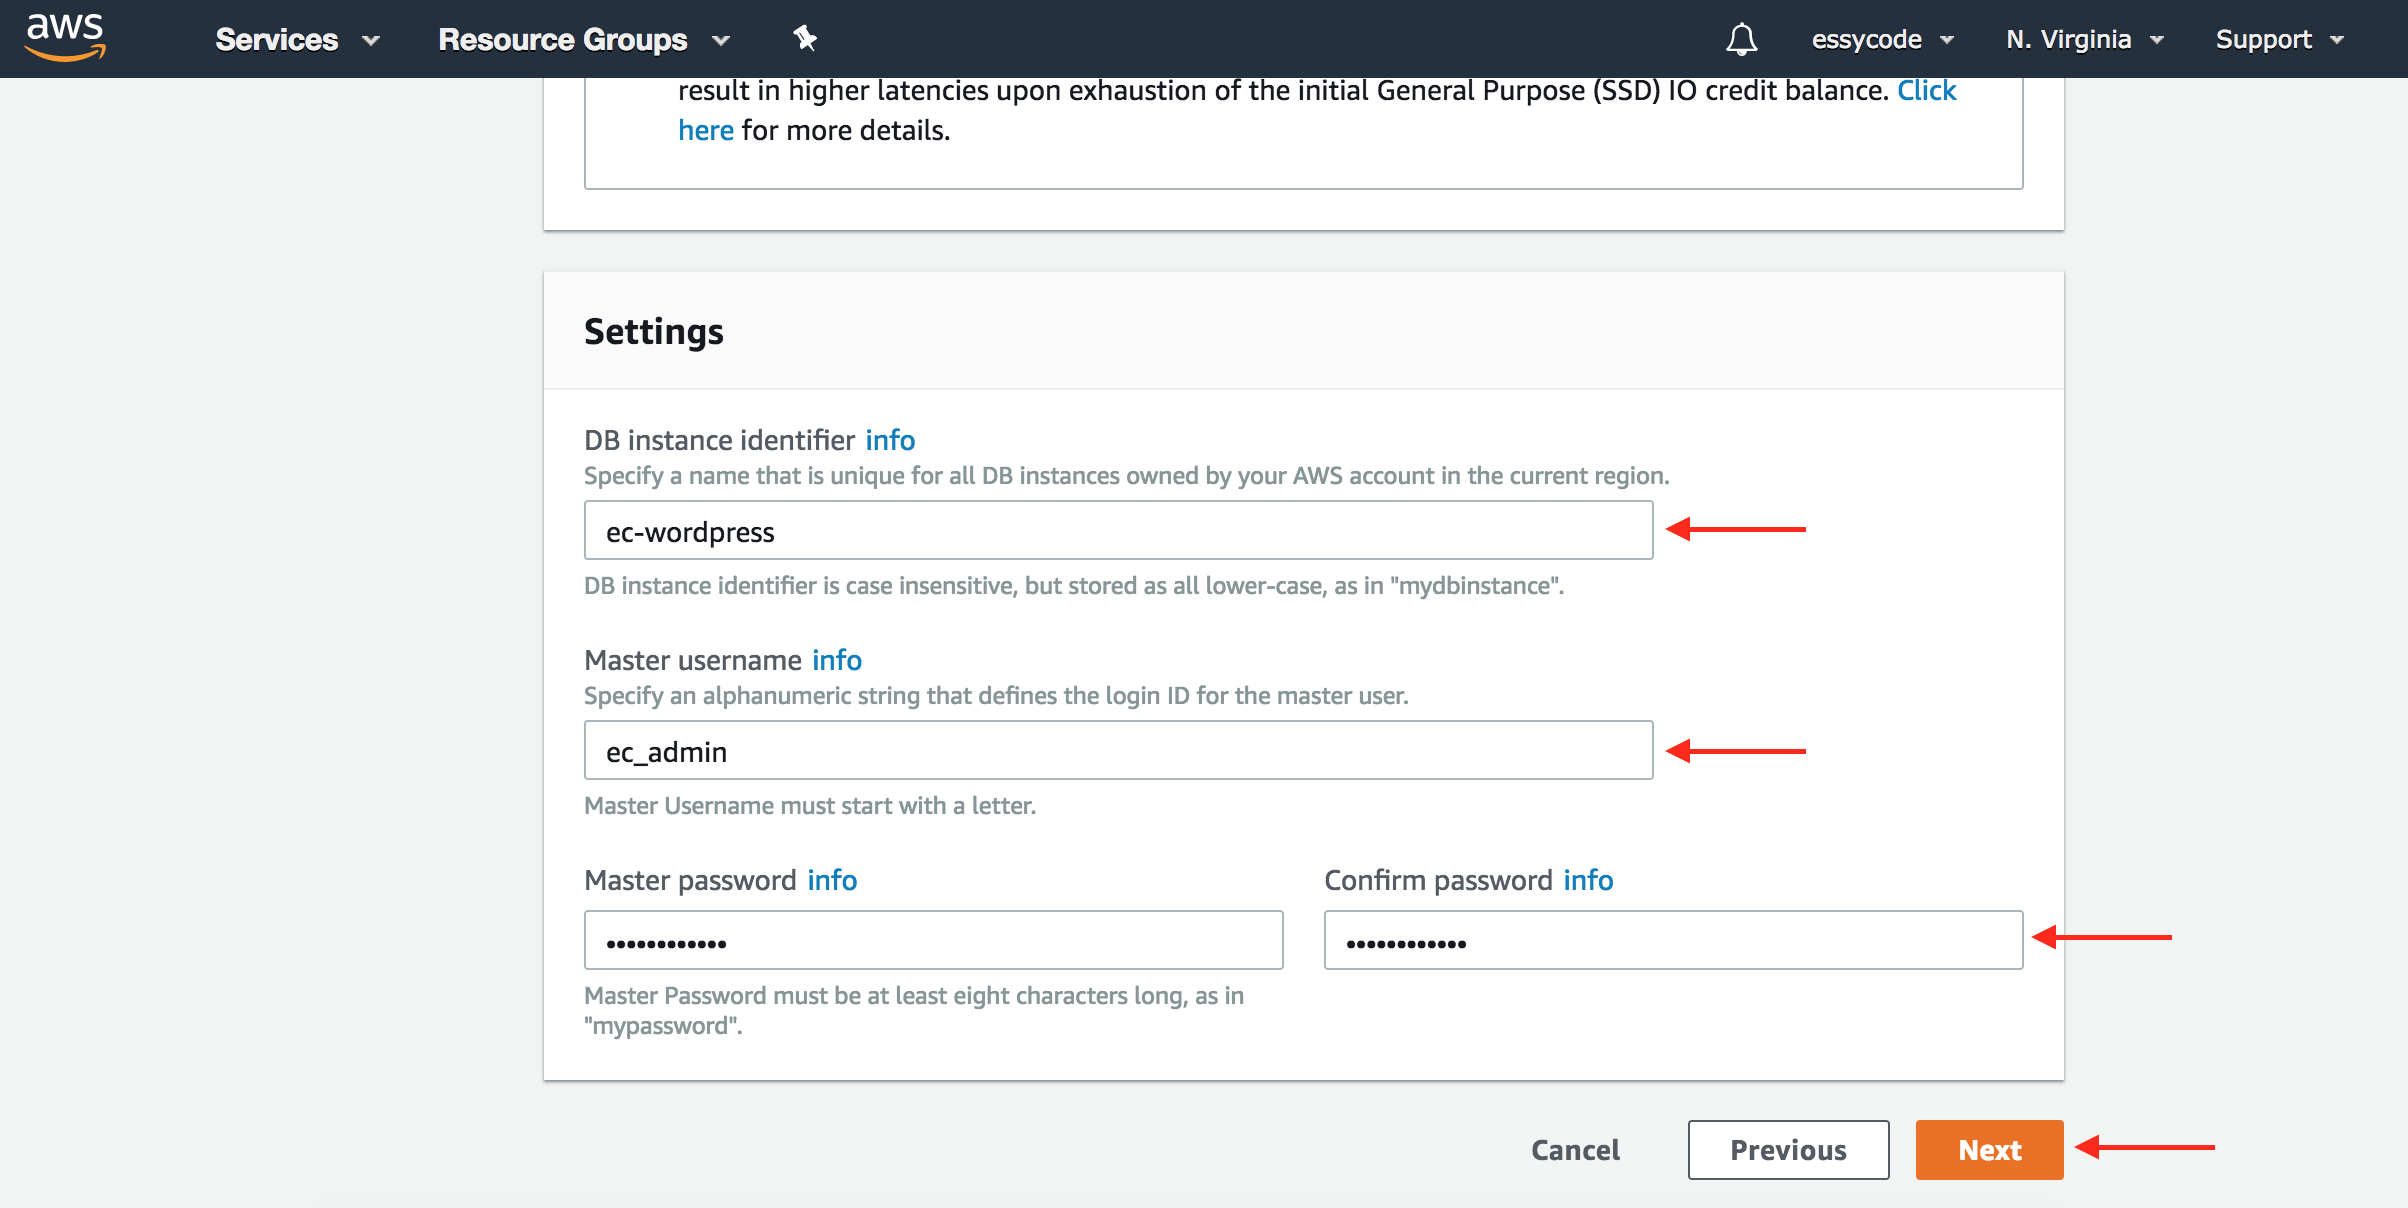
There are a number of settings here that will affect your database performance and pricing. The below suggested configuration is really designed to get a test site up and running; modify the below selections accordingly for your use case.
| DB instance class | Choose d2.t2.micro |
| Multi-AZ deployment | Choose no |
| Storage type | Choose General Purpose (SSD) |
| Allocated storage | Enter 20GB |
| DB instance identifier | This can be any name you choose, eg, “myDbInstance”. |
| Master username | Enter a DB username. You’ll need this later. |
| Master password | Enter a DB password. You’ll need this later. |
Click the “Next” button.
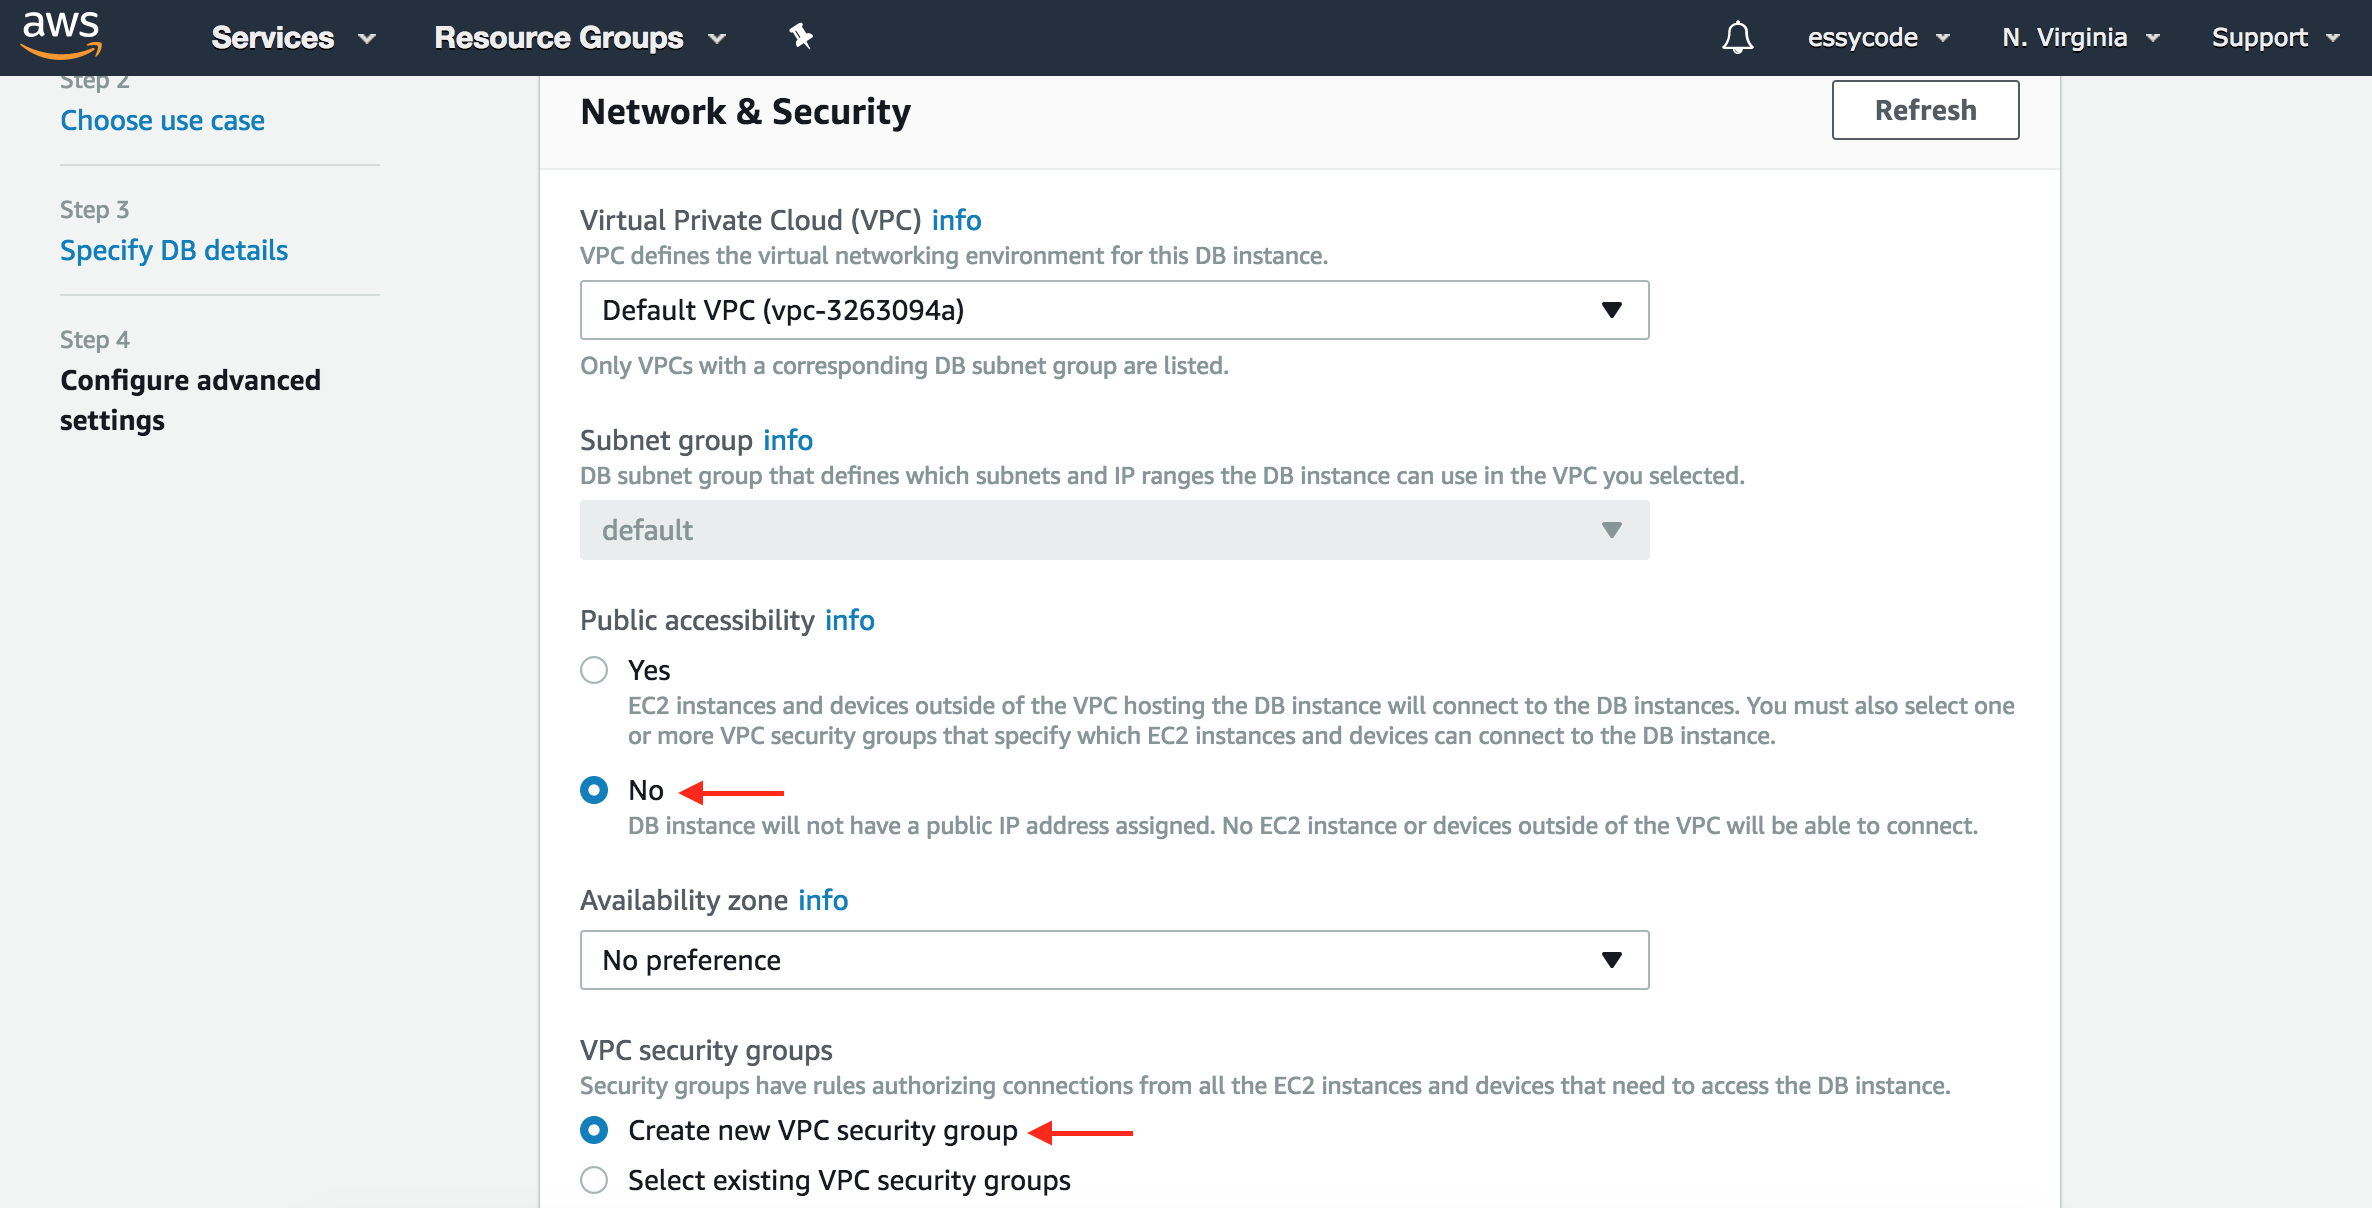
| Public accessibility | Choose no |
| VPC security groups | Choose Create new VPC security group |
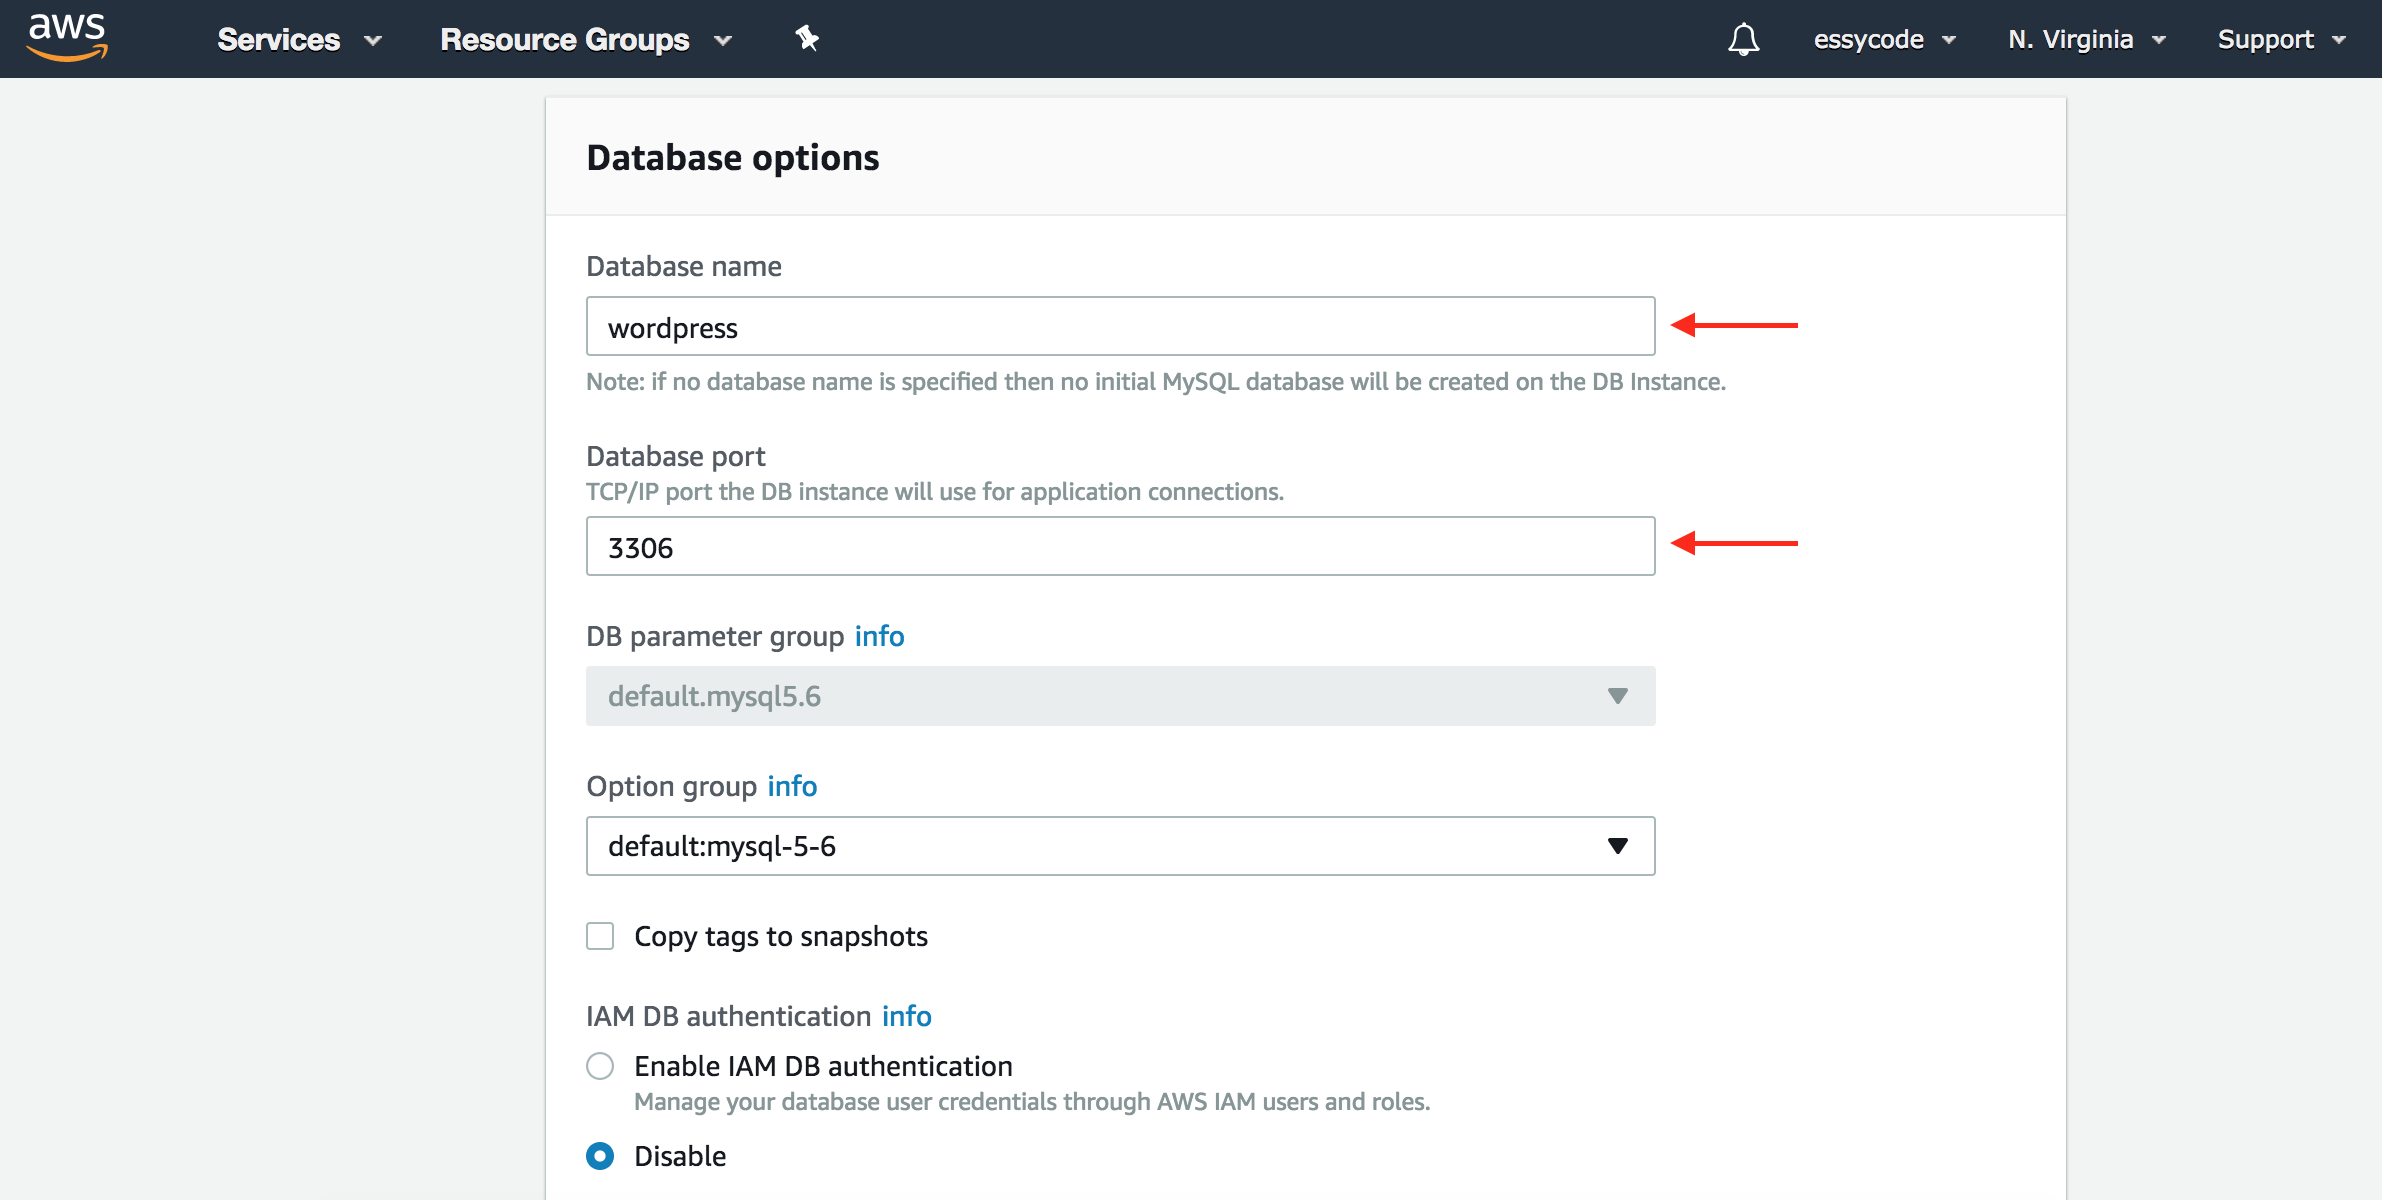
| Database name | Can be anything but “wordpress” works. You’ll need this later. |
| Database port | Confirm that it’s set to 3306. |
Click the “Launch DB Instance” button.
Above we’ve set publicly accessible to “no”, meaning that the database will only be accessible by instances in the same VPC security group. Later we’ll add Elastic Beanstalk to the security group so WordPress can access the database.
It will probably take 10 minutes or so for your instance to launch. Continue on to the next section while this is in progress.
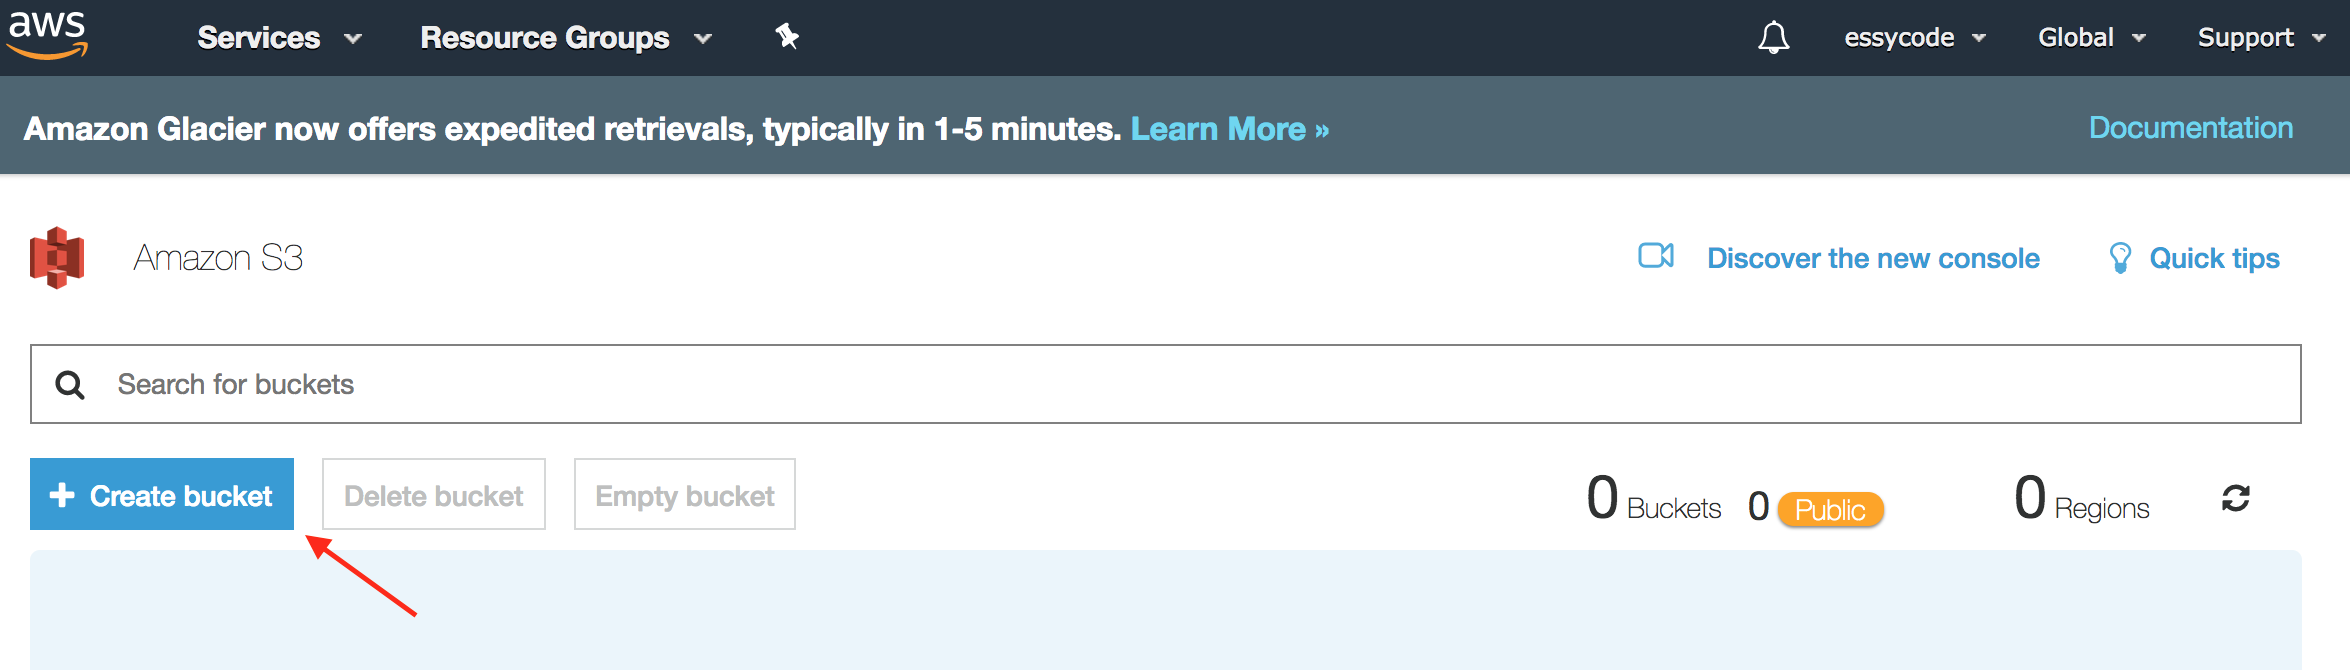
By default WordPress stores your media files (eg, images, pdfs, etc.) in the file system. But any uploaded files will be lost when you deploy a new application version to Elastic Beanstalk. The simplest solution is to instead store your media files in an S3 bucket, which has other advantages as well. This can be achieved using the plugin WP Offload S3. Once activated and configured, WordPress will store media files in your S3 bucket.
Go to the S3 dashboard and click the “Create Bucket” button.
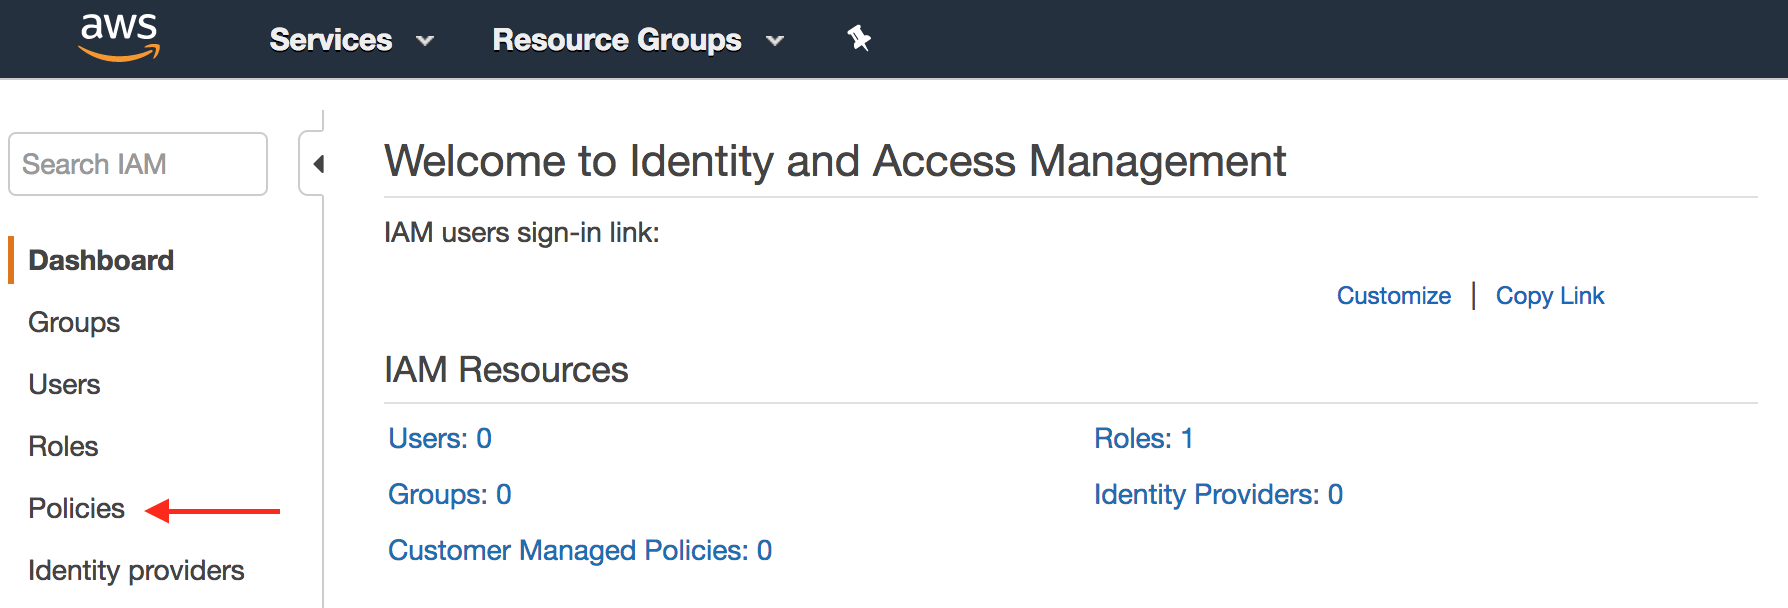
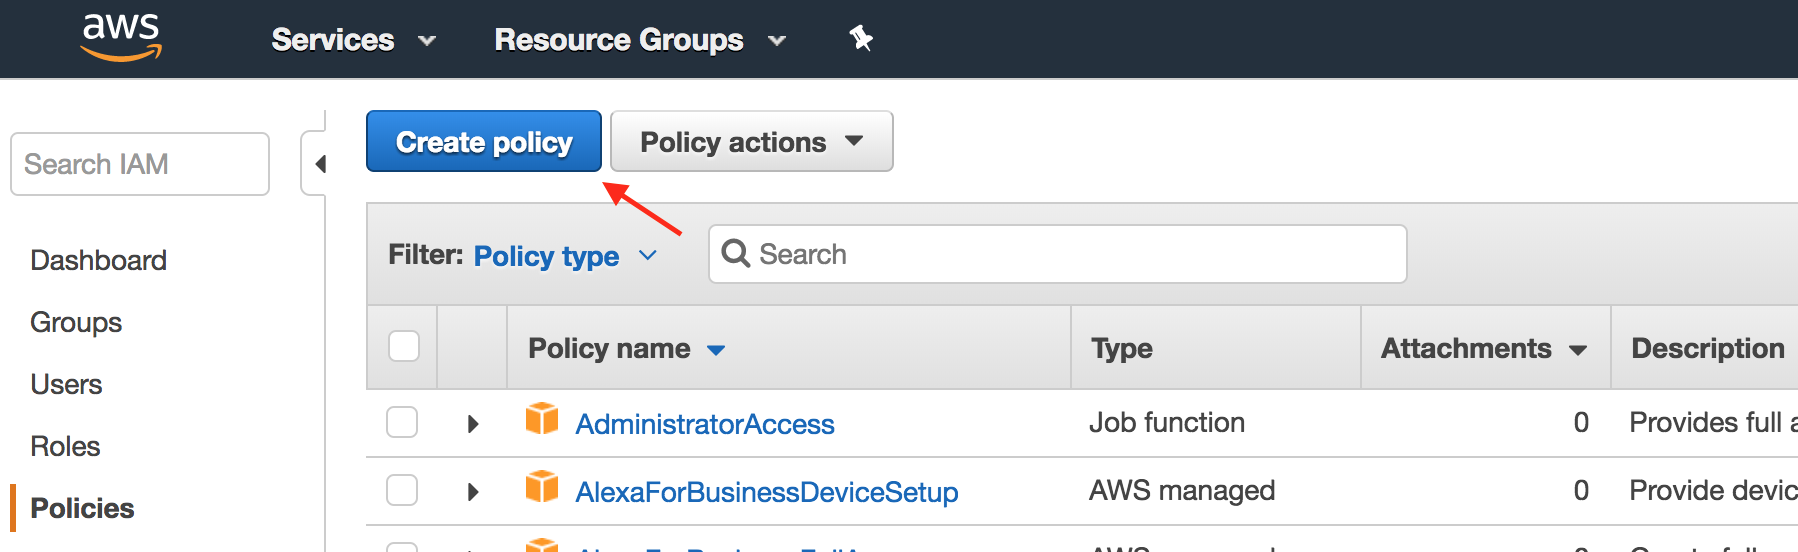
Create a new policy granting permissions to your S3 bucket. Go to the IAM dashboard, select “Policies” from the menu at left , and click the “Create Policy” button .
Select the “JSON” tab and copy and paste the following. Replace “YOUR-BUCKET-NAME” with your S3 bucket name.
      {
        "Version": "2012-10-17",
        "Statement": [
          {
            "Effect": "Allow",
            "Action": [
              "s3:DeleteObject",
              "s3:GetObject",
              "s3:GetObjectAcl",
              "s3:ListBucket",
              "s3:PutObject",
              "s3:PutObjectAcl",
              "s3:GetBucketLocation"
            ],
            "Resource": [
              "arn:aws:s3:::YOUR-BUCKET-NAME",
              "arn:aws:s3:::YOUR-BUCKET-NAME/*"
            ]
          }
        ]
      }
This policy will grant access to our S3 bucket:
Click the “Review Policy” button at bottom and create a name for your policy.
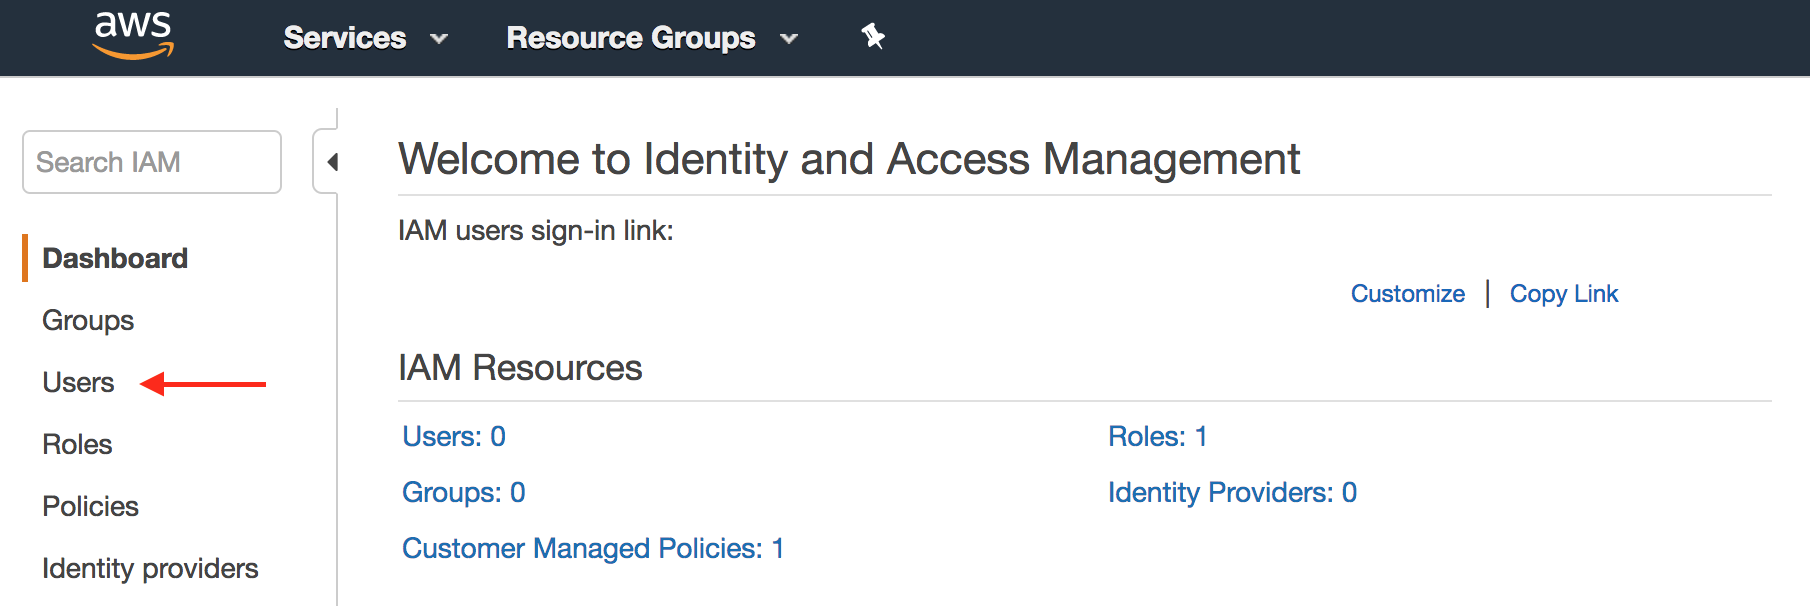
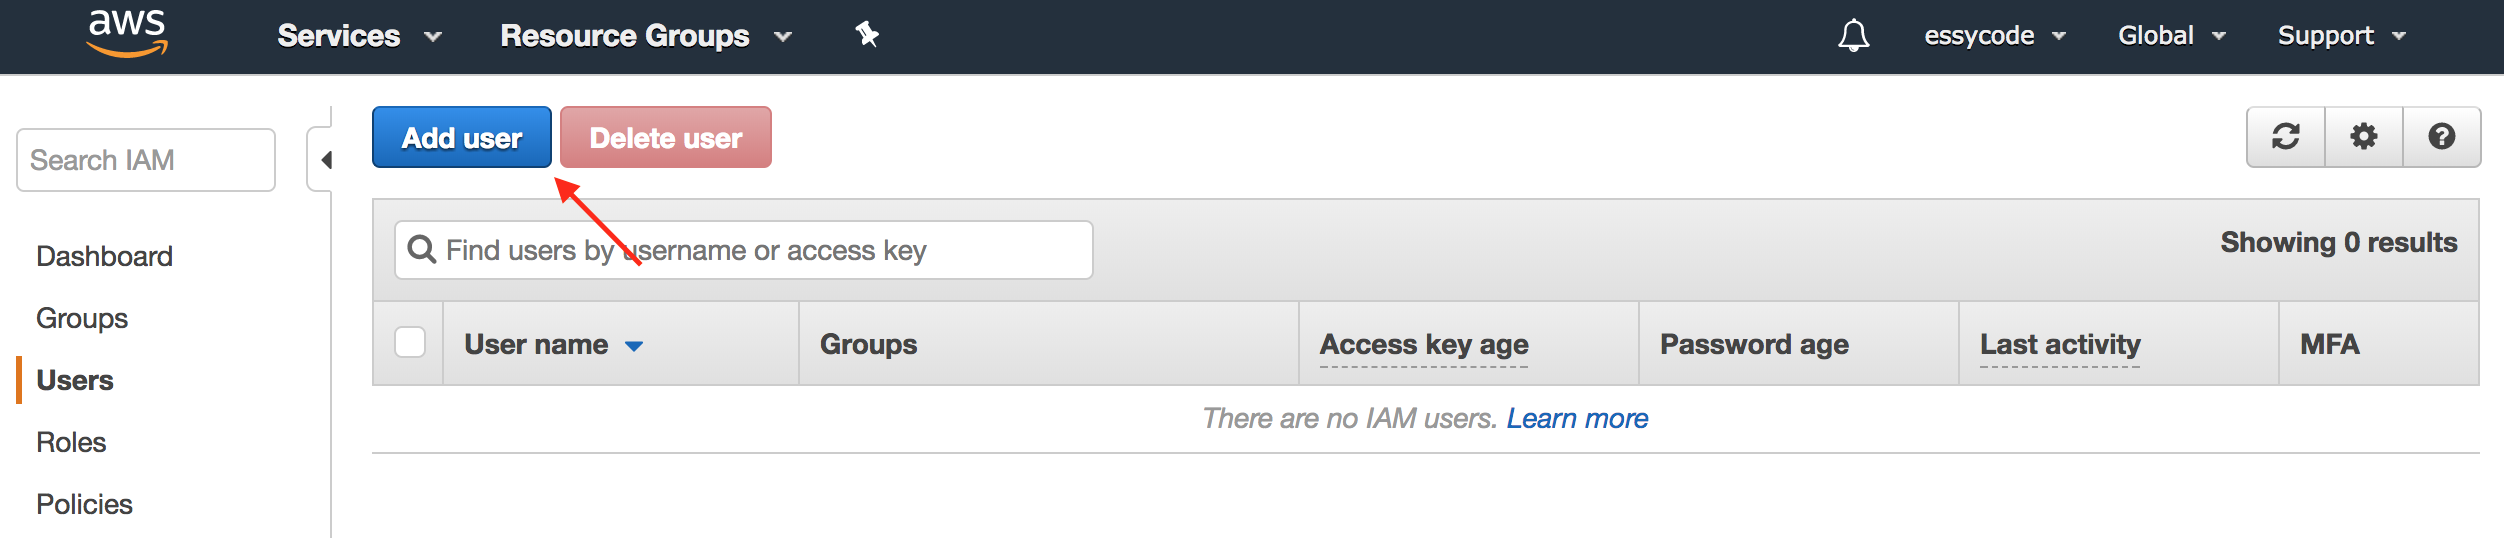
Create a new IAM user to provide access to your S3 bucket. Go to the IAM dashboard, select “Users” from the menu at left , and click the “Add User” button .
| User name | Enter something descriptive, like “wordpress-s3” |
| Access type | Choose Programmatic access |
| Permissions | Select Attach existing policies directly and add the policy you created in the previous step. |
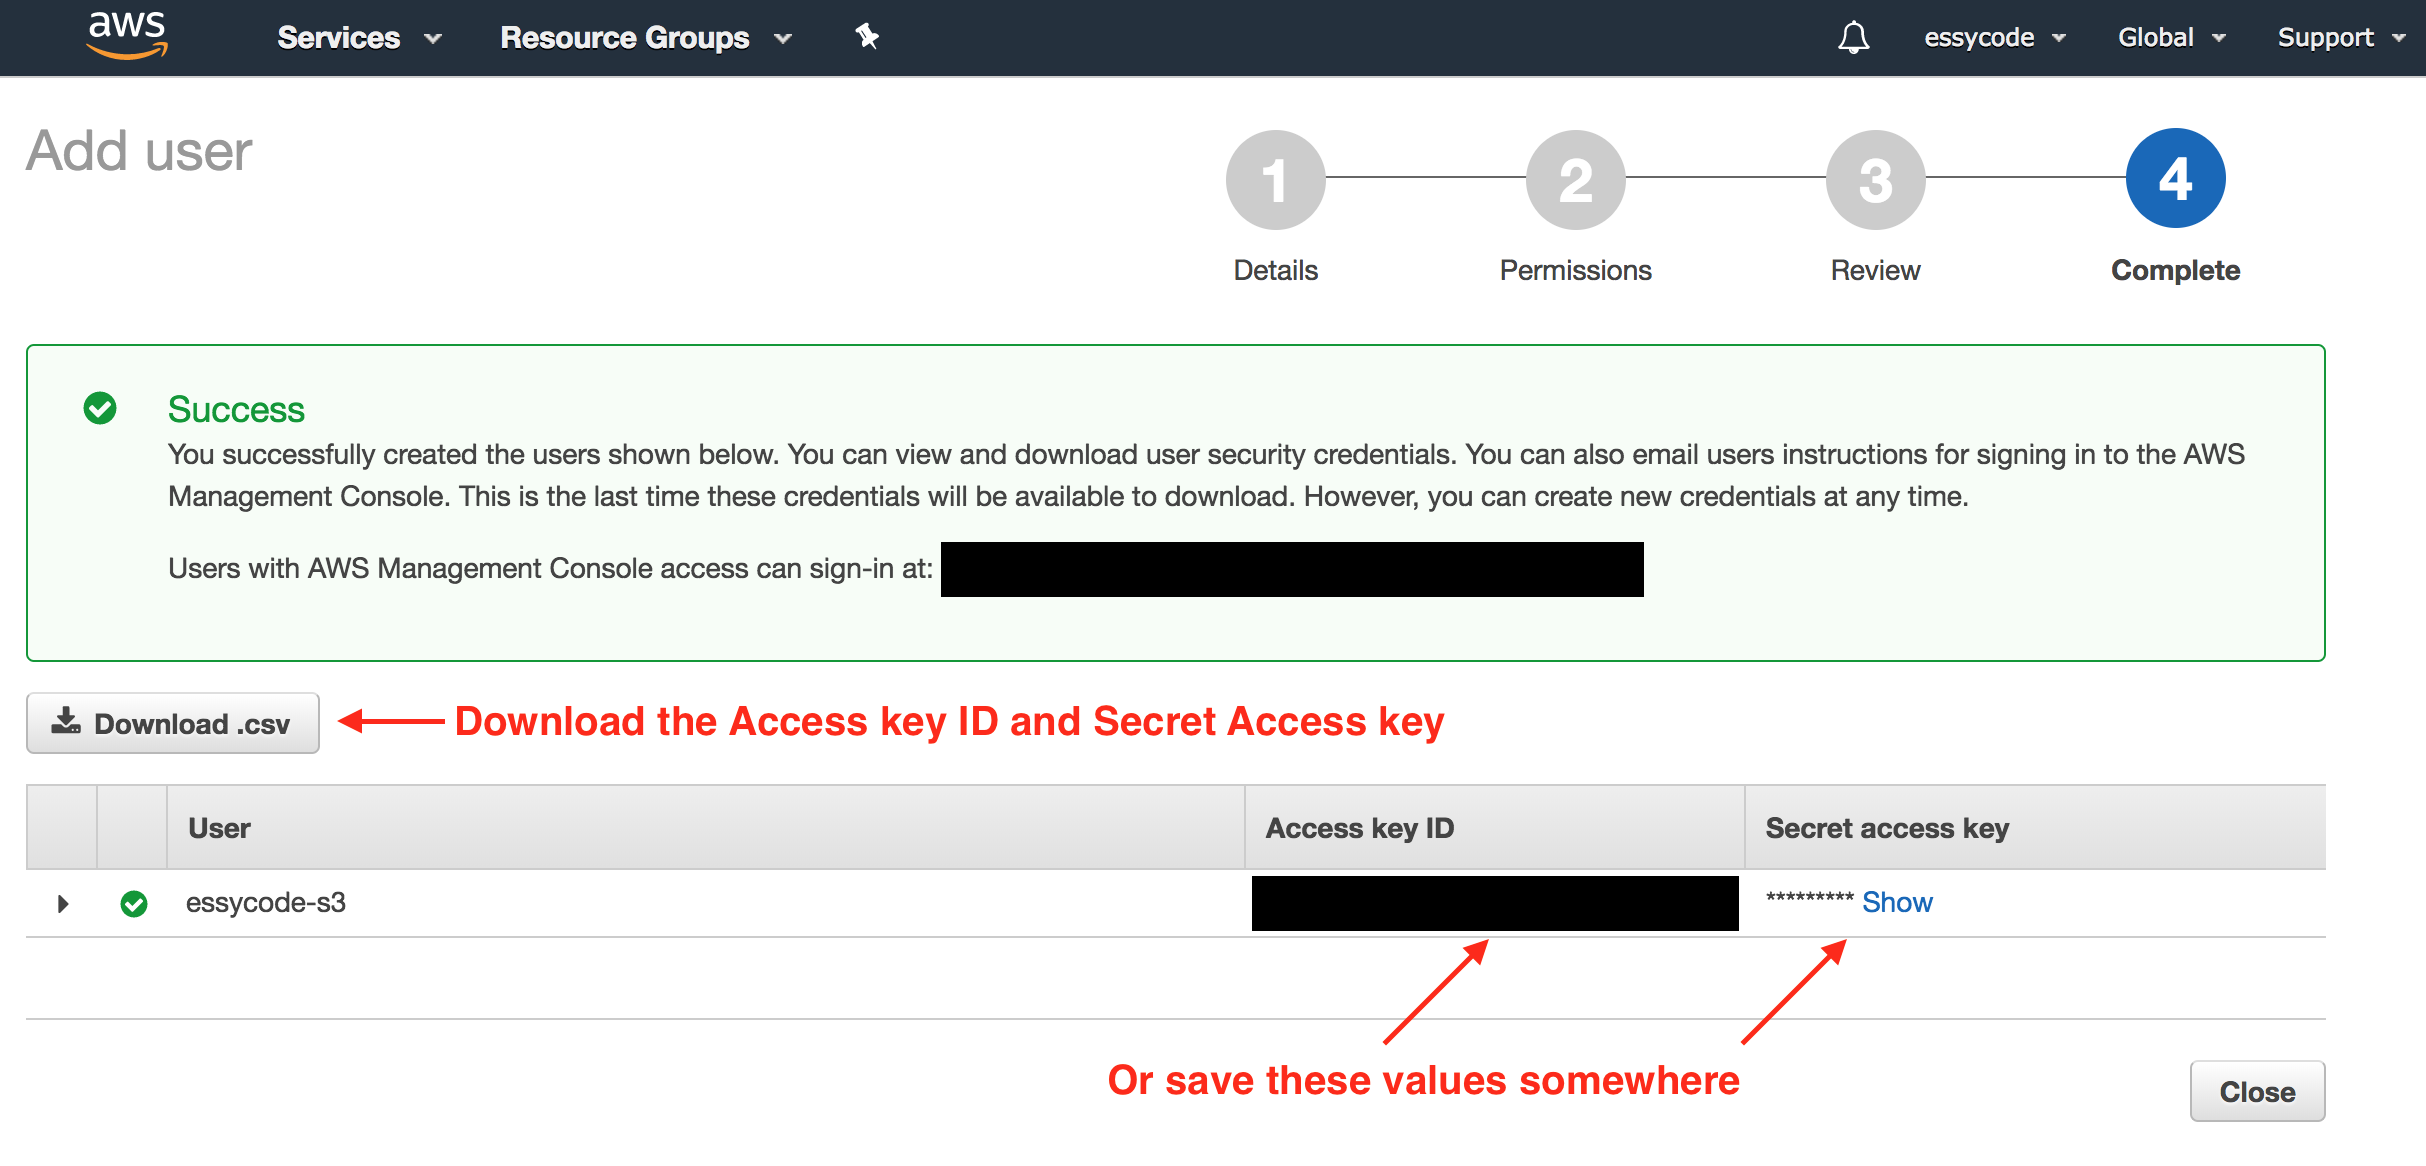
Once the new user is created you should be presented with an Access Key Id and Secret Access Key. Store these values in a safe place as you will need them later .
We need an application to deploy to Elastic Beanstalk. In this section we’ll create the needed files to compose the source bundle we’ll upload to Elastic Beanstalk.
Download the latest version of WordPress or install it from the command line:
curl https://wordpress.org/latest.tar.gz | tar -xvz
You should now have a directory named wordpress.
We need to install the WP Offload S3 plugin that we’ll be using to store media files in S3. Go to the plugin page and download the latest version. Unzip the package and save the plugin to wordpress/wp-content/plugins/.
The WP Offload S3 plugin requires the Amazon Web Services plugin. Download this plugin as well, unzip the package, and save to wordpress/wp-content/plugins/.
Delete wordpress/wp-config-sample.php and create a new file wordpress/wp-config.php:
      <?php

      // AWS configuration for WP Offload S3.
      define('DBI_AWS_ACCESS_KEY_ID',     $_SERVER['AWS_ACCESS_KEY_ID']);
      define('DBI_AWS_SECRET_ACCESS_KEY', $_SERVER['AWS_SECRET_ACCESS_KEY']);

      // MySQL configuration.
      define('DB_NAME',     $_SERVER['RDS_DB_NAME']);
      define('DB_USER',     $_SERVER['RDS_USERNAME']);
      define('DB_PASSWORD', $_SERVER['RDS_PASSWORD']);
      define('DB_HOST',     $_SERVER['RDS_HOSTNAME'] . ':' . $_SERVER['RDS_PORT']);
      define('DB_CHARSET',  'utf8');
      define('DB_COLLATE',  '');

      // Authentication keys and salts.
      define('AUTH_KEY',         $_SERVER['WP_AUTH_KEY']);
      define('SECURE_AUTH_KEY',  $_SERVER['WP_SECURE_AUTH_KEY']);
      define('LOGGED_IN_KEY',    $_SERVER['WP_LOGGED_IN_KEY']);
      define('NONCE_KEY',        $_SERVER['WP_NONCE_KEY']);
      define('AUTH_SALT',        $_SERVER['WP_AUTH_SALT']);
      define('SECURE_AUTH_SALT', $_SERVER['WP_SECURE_AUTH_SALT']);
      define('LOGGED_IN_SALT',   $_SERVER['WP_LOGGED_IN_SALT']);
      define('NONCE_SALT',       $_SERVER['WP_NONCE_SALT']);

      // Other WordPress defaults.
      $table_prefix = 'wp_';
      define('WP_DEBUG', false);
      if (!defined('ABSPATH'))
      define('ABSPATH', dirname(__FILE__) . '/');
      require_once(ABSPATH . 'wp-settings.php');
The configuration file references several properties of $_SERVER that we’ll define in an Elastic Beanstalk configuration file in the next step.
Create a new folder wordpress/.ebextensions. Elastic Beanstalk looks for configuration files in this directory when deploying an application. Create a new file wordpress/.ebextensions/env.config:
      option_settings:
        aws:elasticbeanstalk:application:environment:
          AWS_ACCESS_KEY_ID: 'placeholder'
          AWS_SECRET_ACCESS_KEY: 'placeholder'

          WP_AUTH_KEY: 'placeholder'
          WP_SECURE_AUTH_KEY: 'placeholder'
          WP_LOGGED_IN_KEY: 'placeholder'
          WP_NONCE_KEY: 'placeholder'
          WP_AUTH_SALT: 'placeholder'
          WP_SECURE_AUTH_SALT: 'placeholder'
          WP_LOGGED_IN_SALT: 'placeholder'
          WP_NONCE_SALT: 'placeholder'

          RDS_DB_NAME: 'placeholder'
          RDS_HOSTNAME: 'placeholder'
          RDS_PORT: '3306'
          RDS_USERNAME: 'placeholder'
          RDS_PASSWORD: 'placeholder'
You’ll have to replace all the ‘placeholder’ values with your own values.
Your source directory wordpress should now look roughly like the following. New files and directories are highlighted:
To deploy the application to Elastic Beanstalk we zip all the members of the wordpress directory into a bundle. Note that we zip all the files in the directory, not the directory itself. In the console, navigate to inside the wordpress directory and enter the following command:
zip -rq artifact.zip .
This should create a file wordpress/artifact.zip.
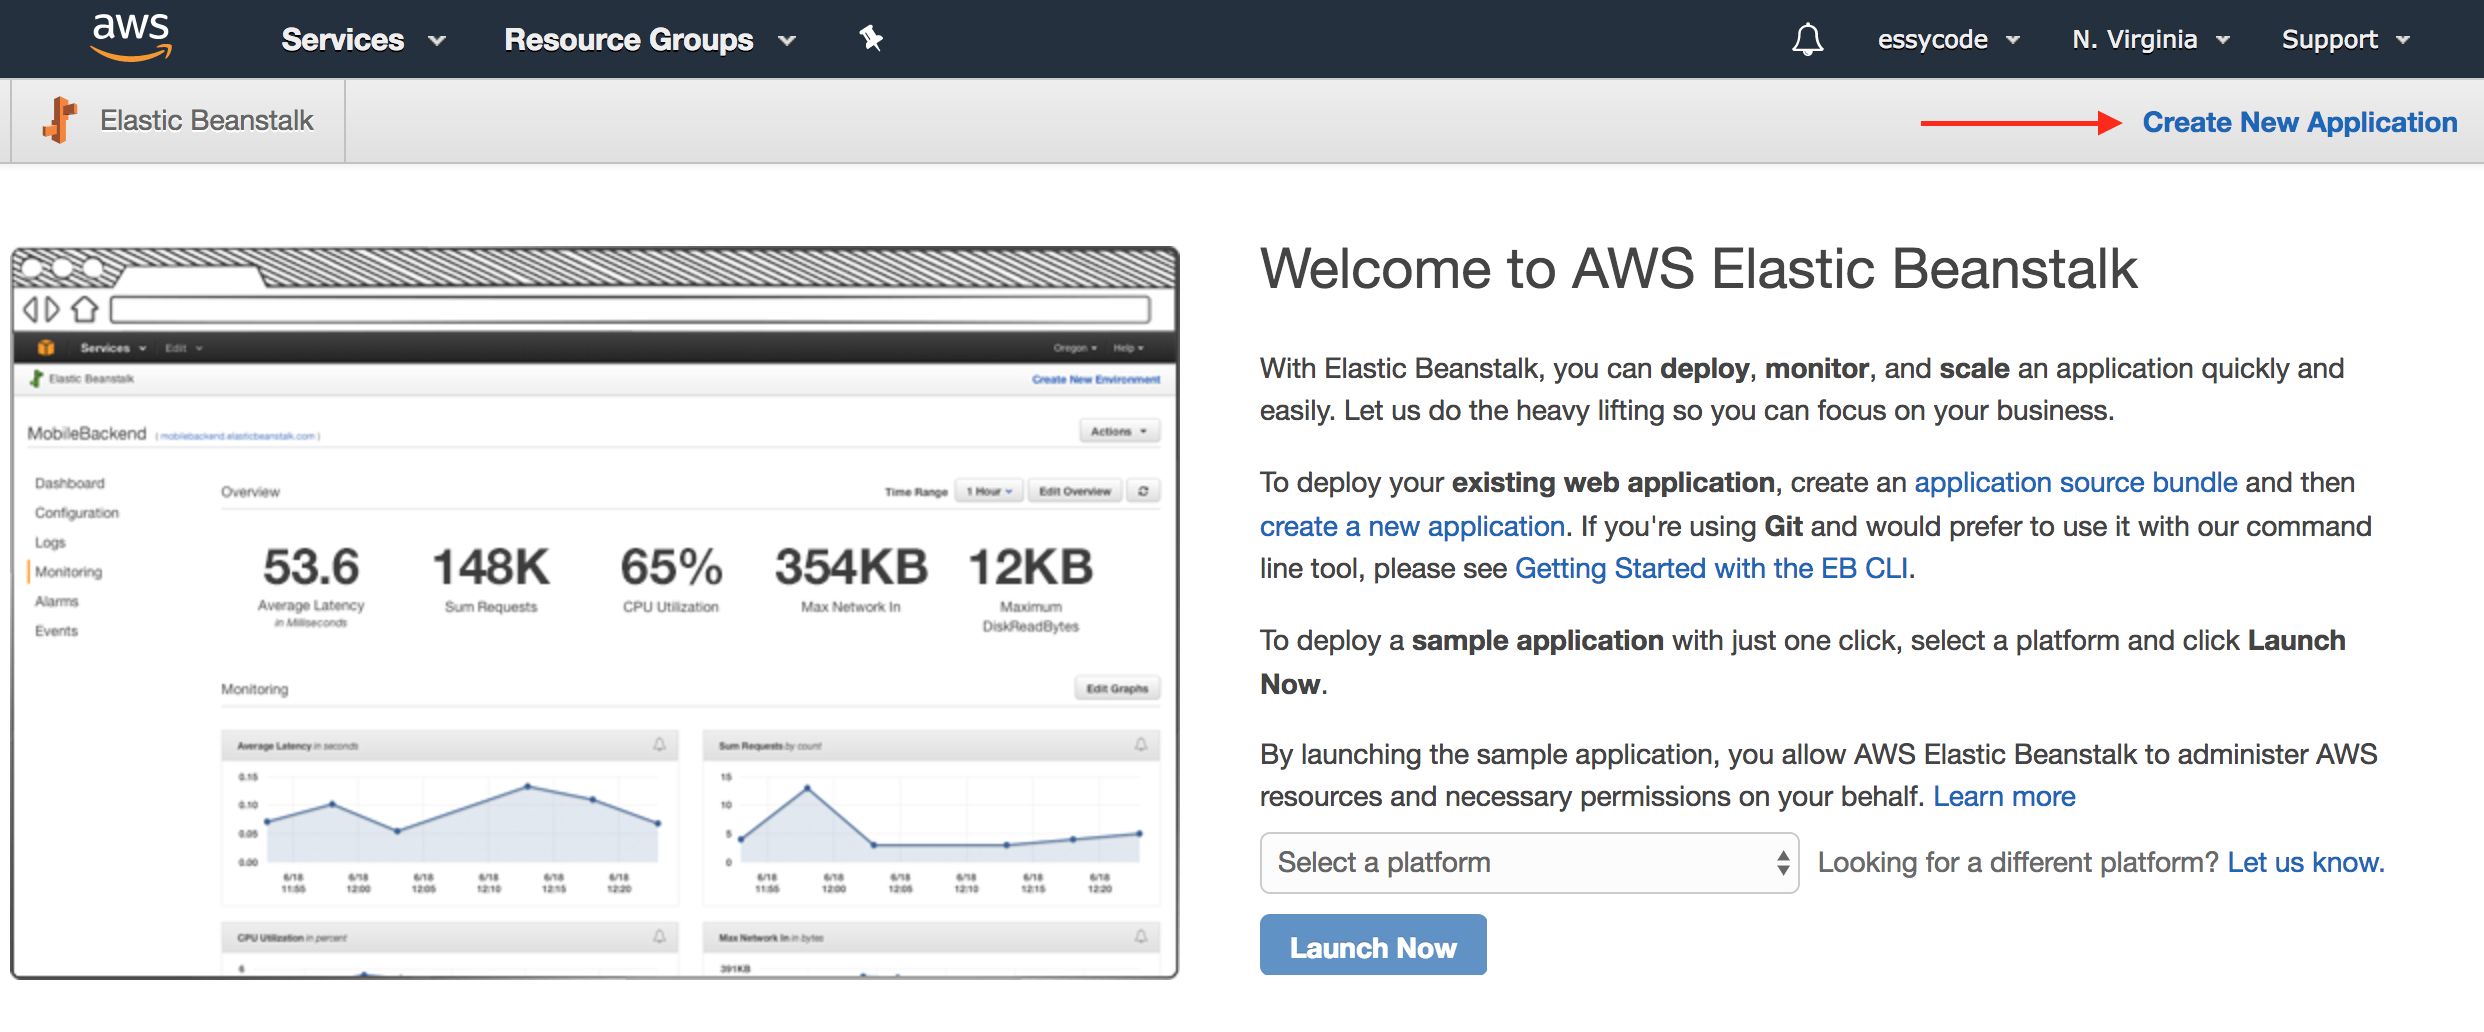
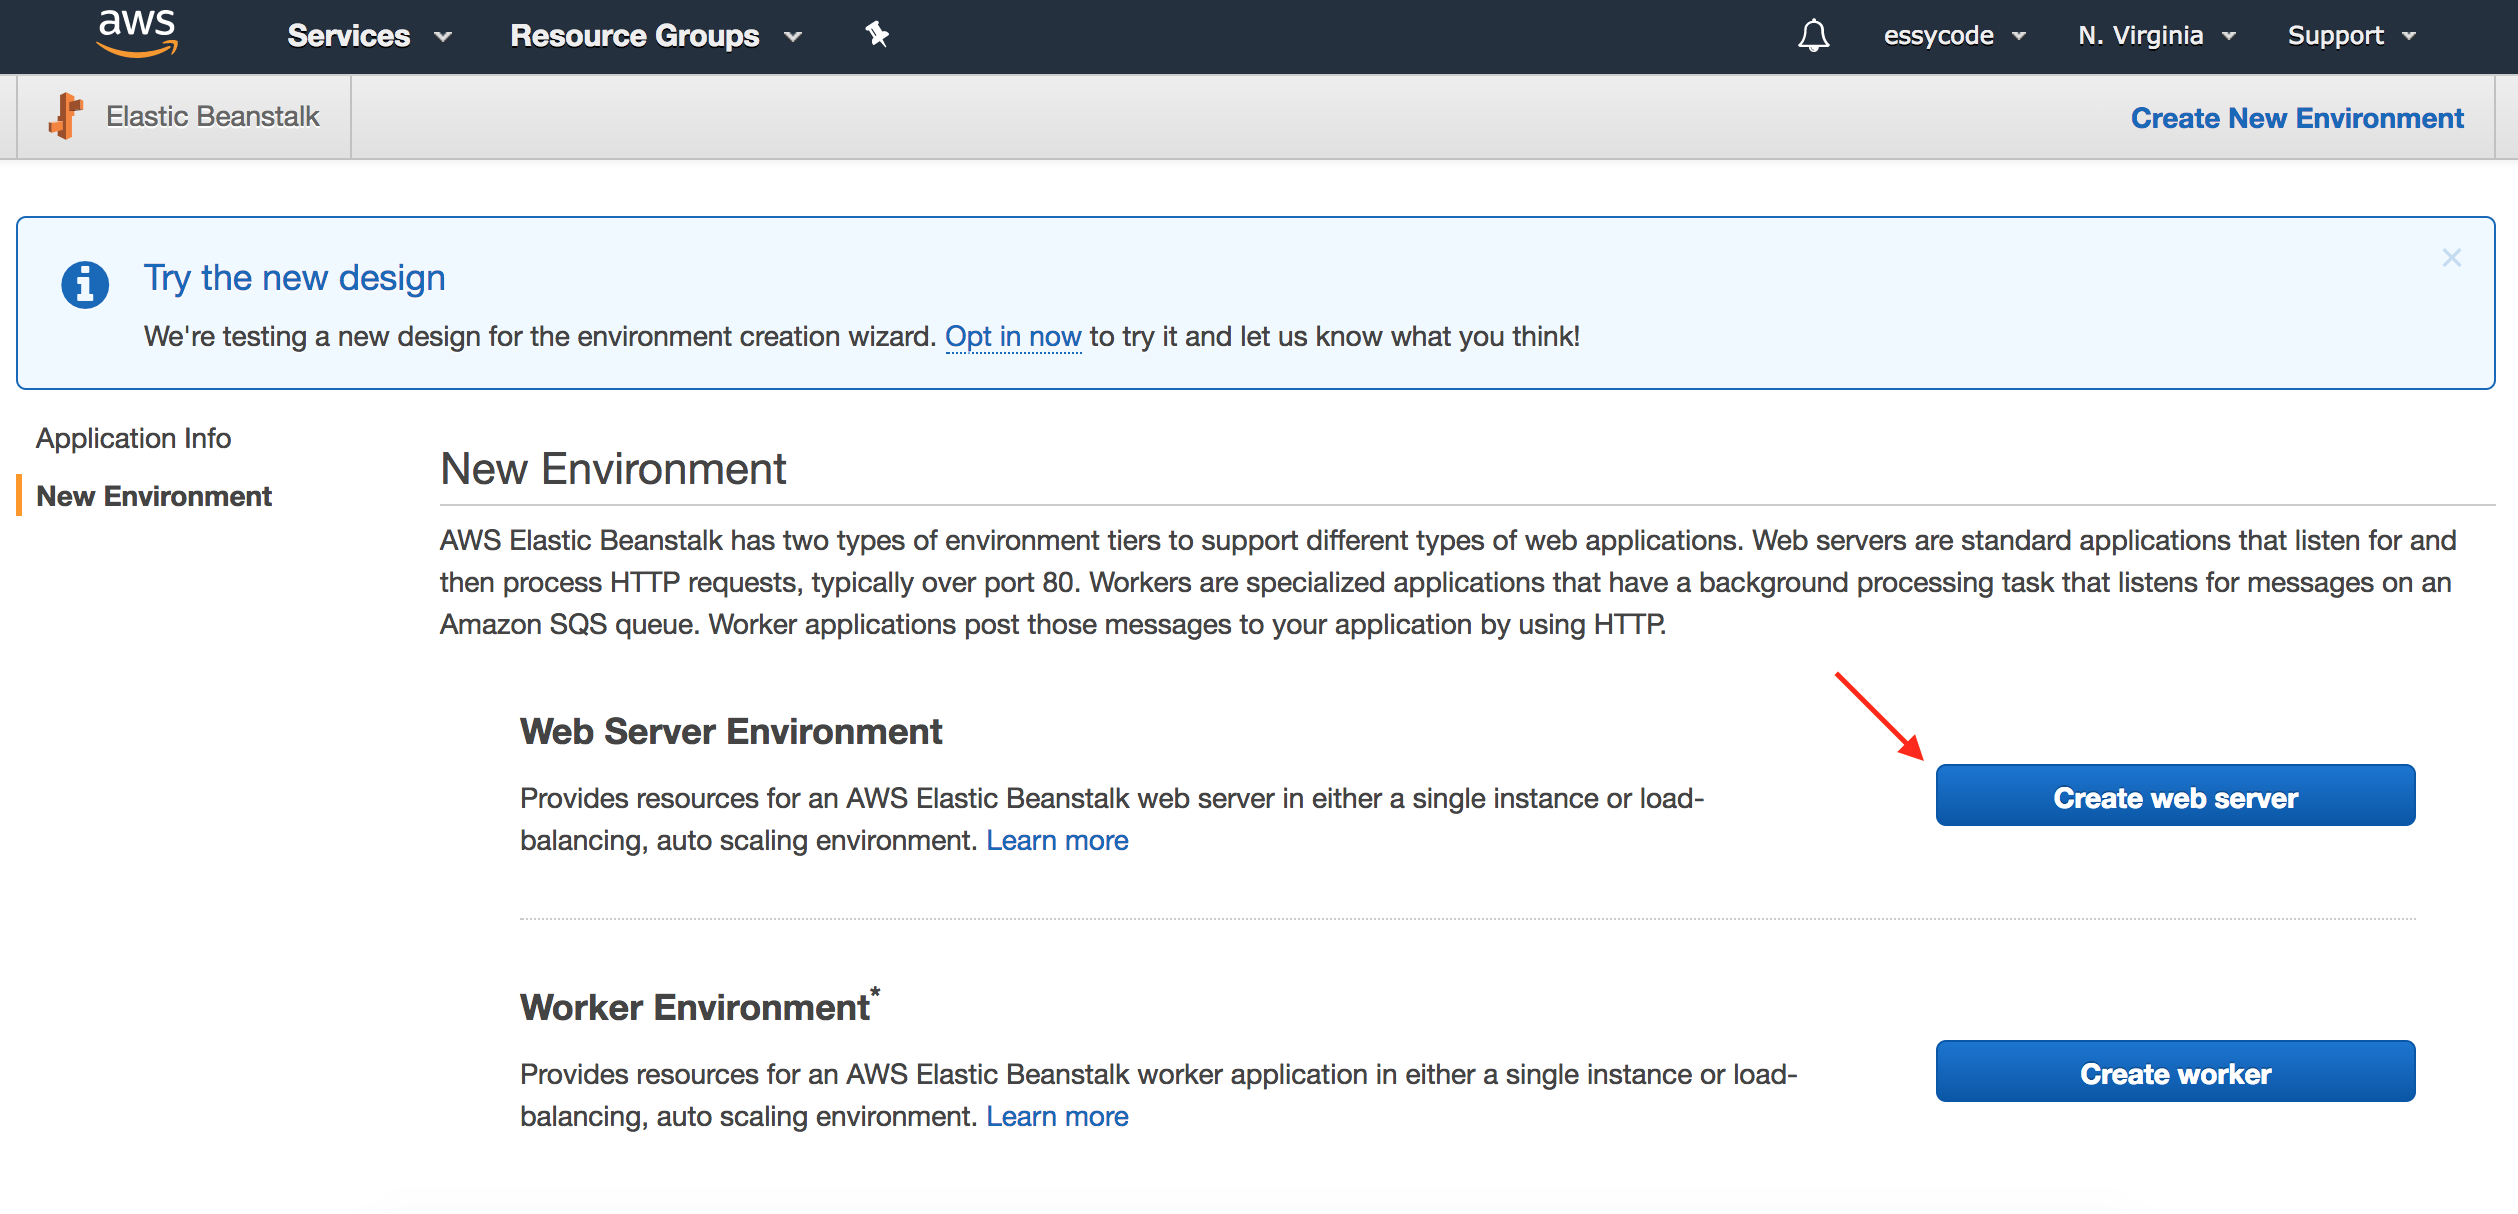
Go to the Elastic Beanstalk dashboard and click “Create New Application” in the upper right . You will be guided through the following pages:
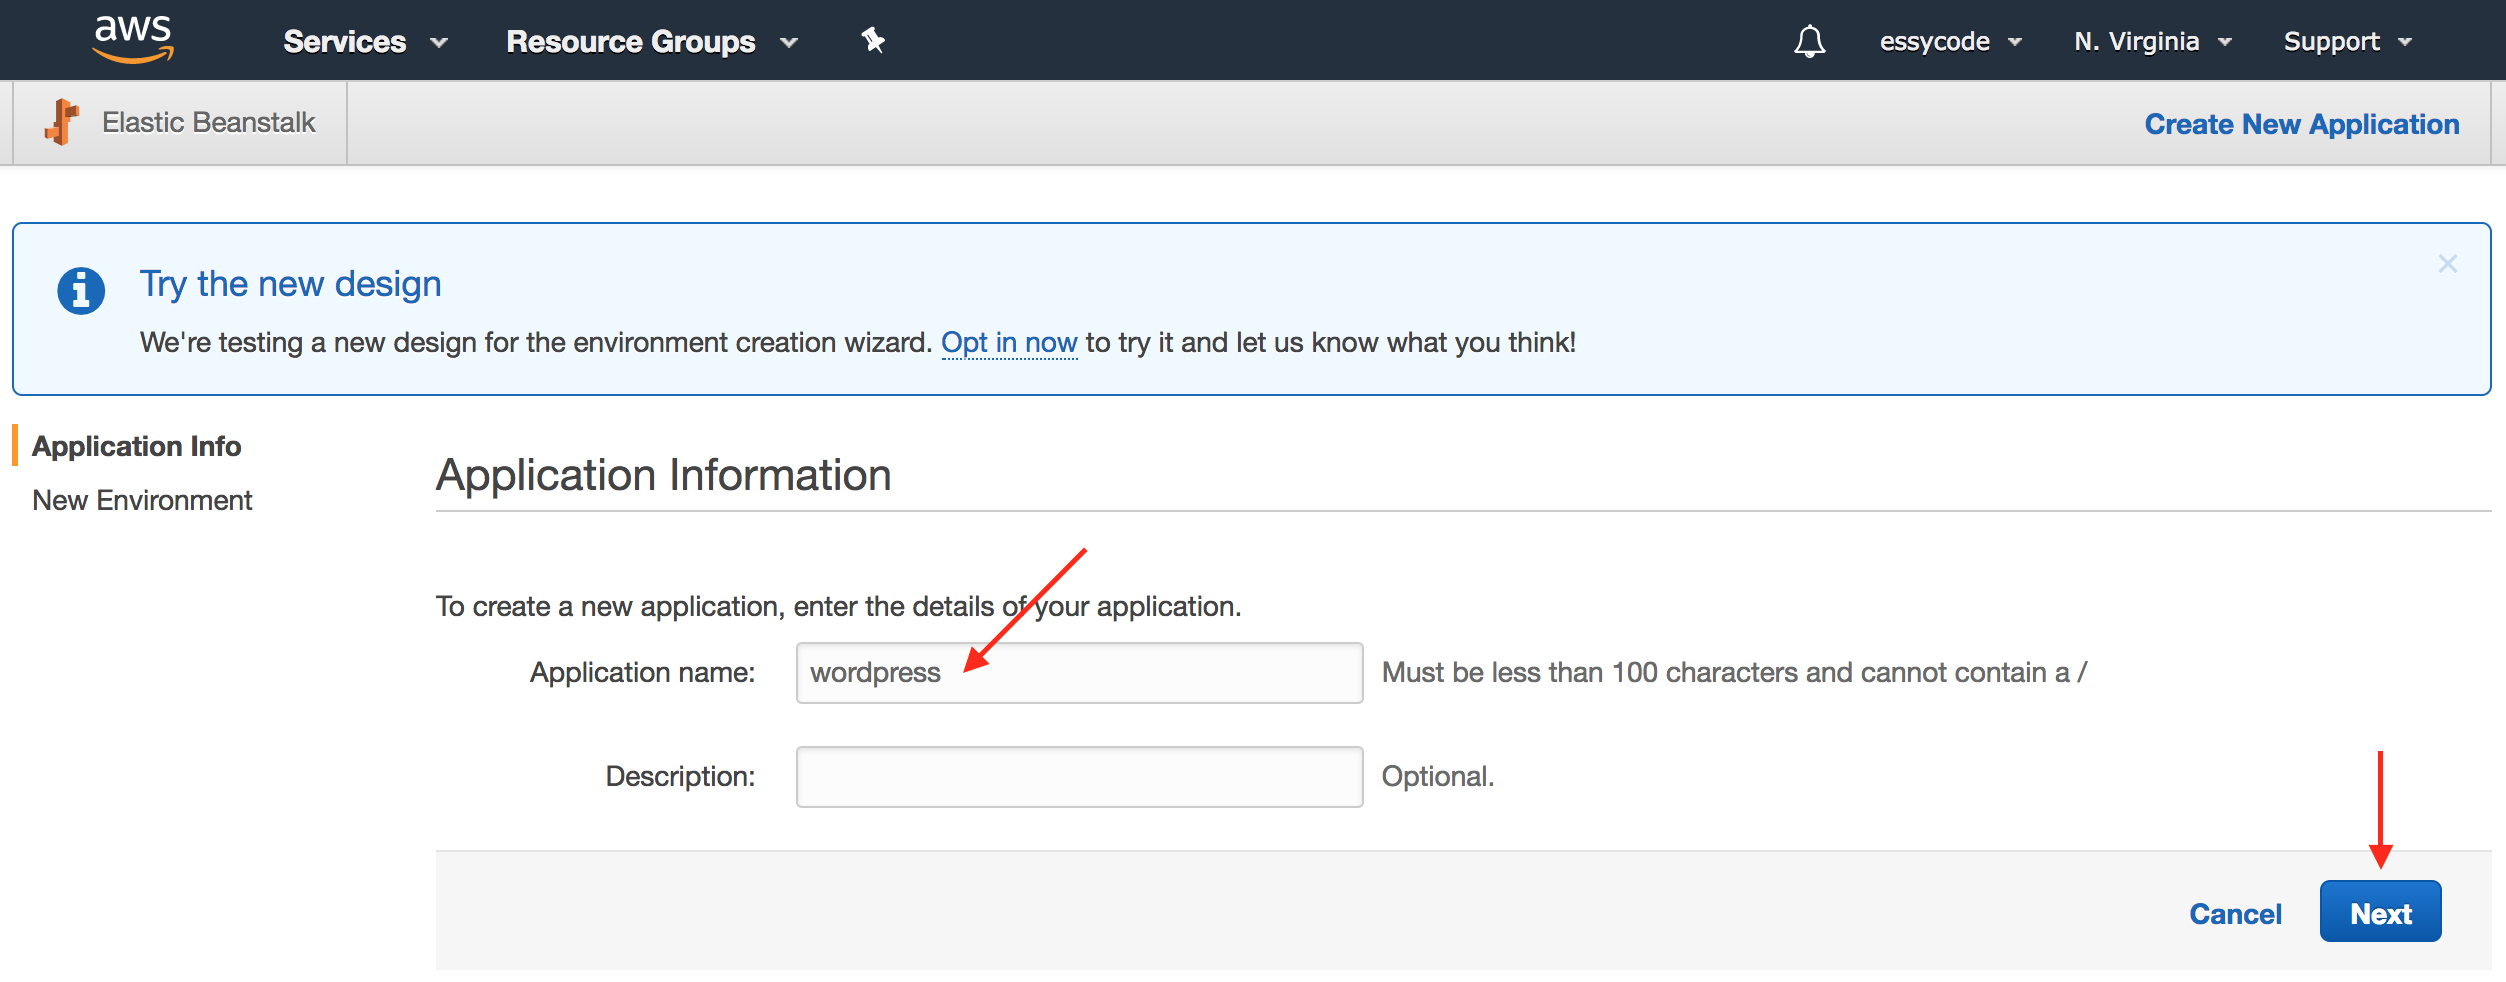
| Application name | Enter something descriptive, such as “wordpress”. Click “Next” button. |
Click Create web server.
| Predefined configuration | Choose PHP. |
| Environment type | Choose Load balancing, auto scaling. |
| Click “Next” button. | |
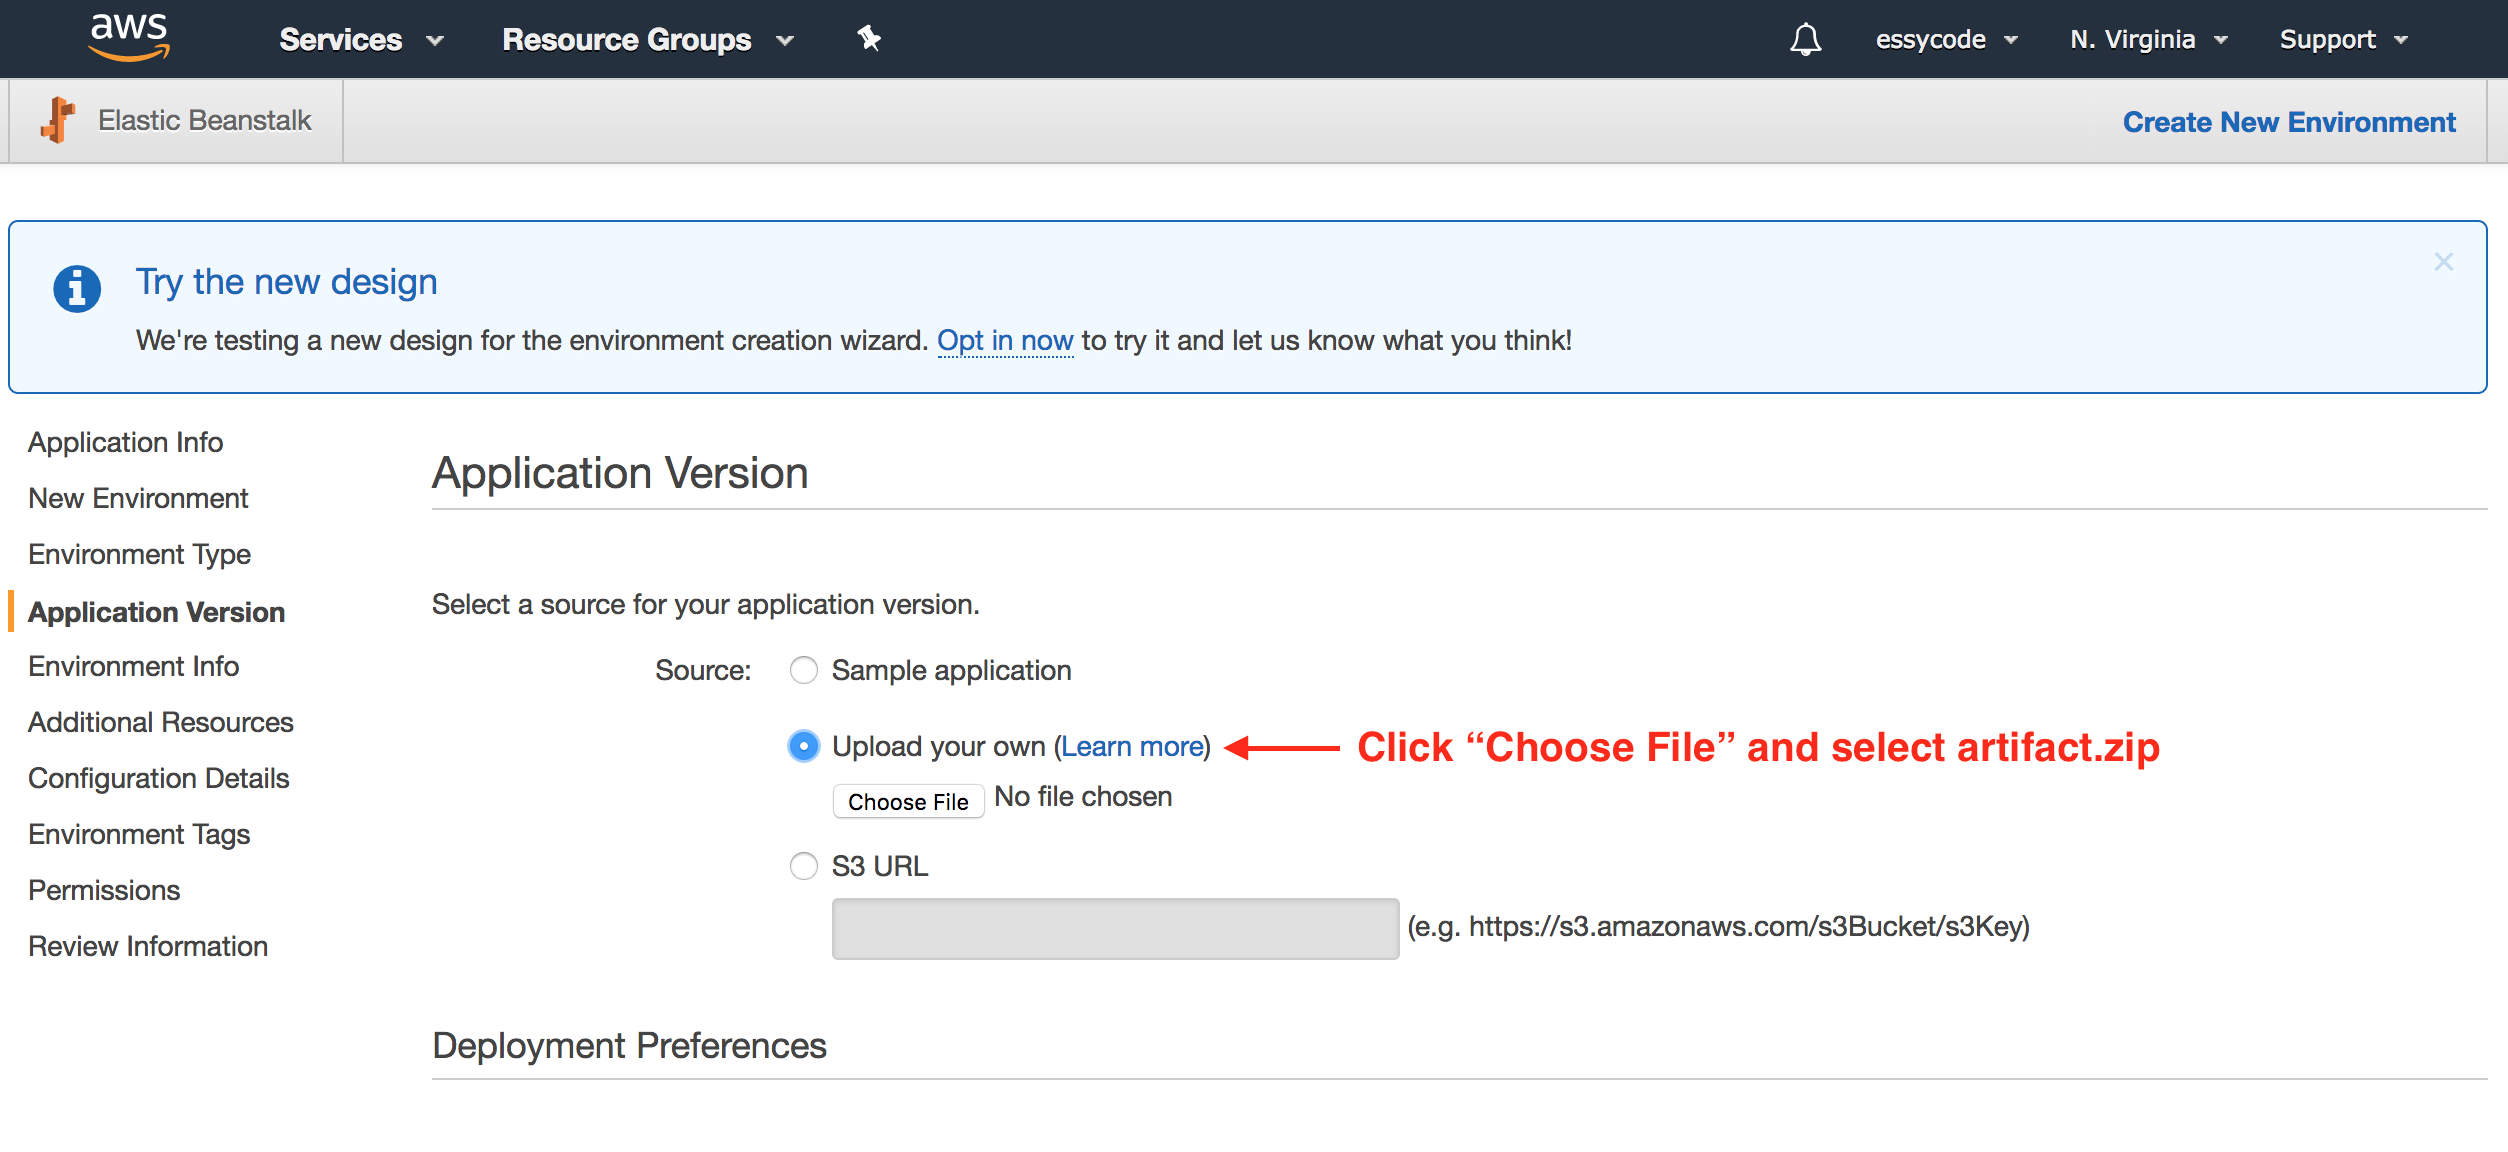
| Source | Choose Upload your own and select the wordpress/artifact.zip file you created earlier. |
| Click “Next” button. | |
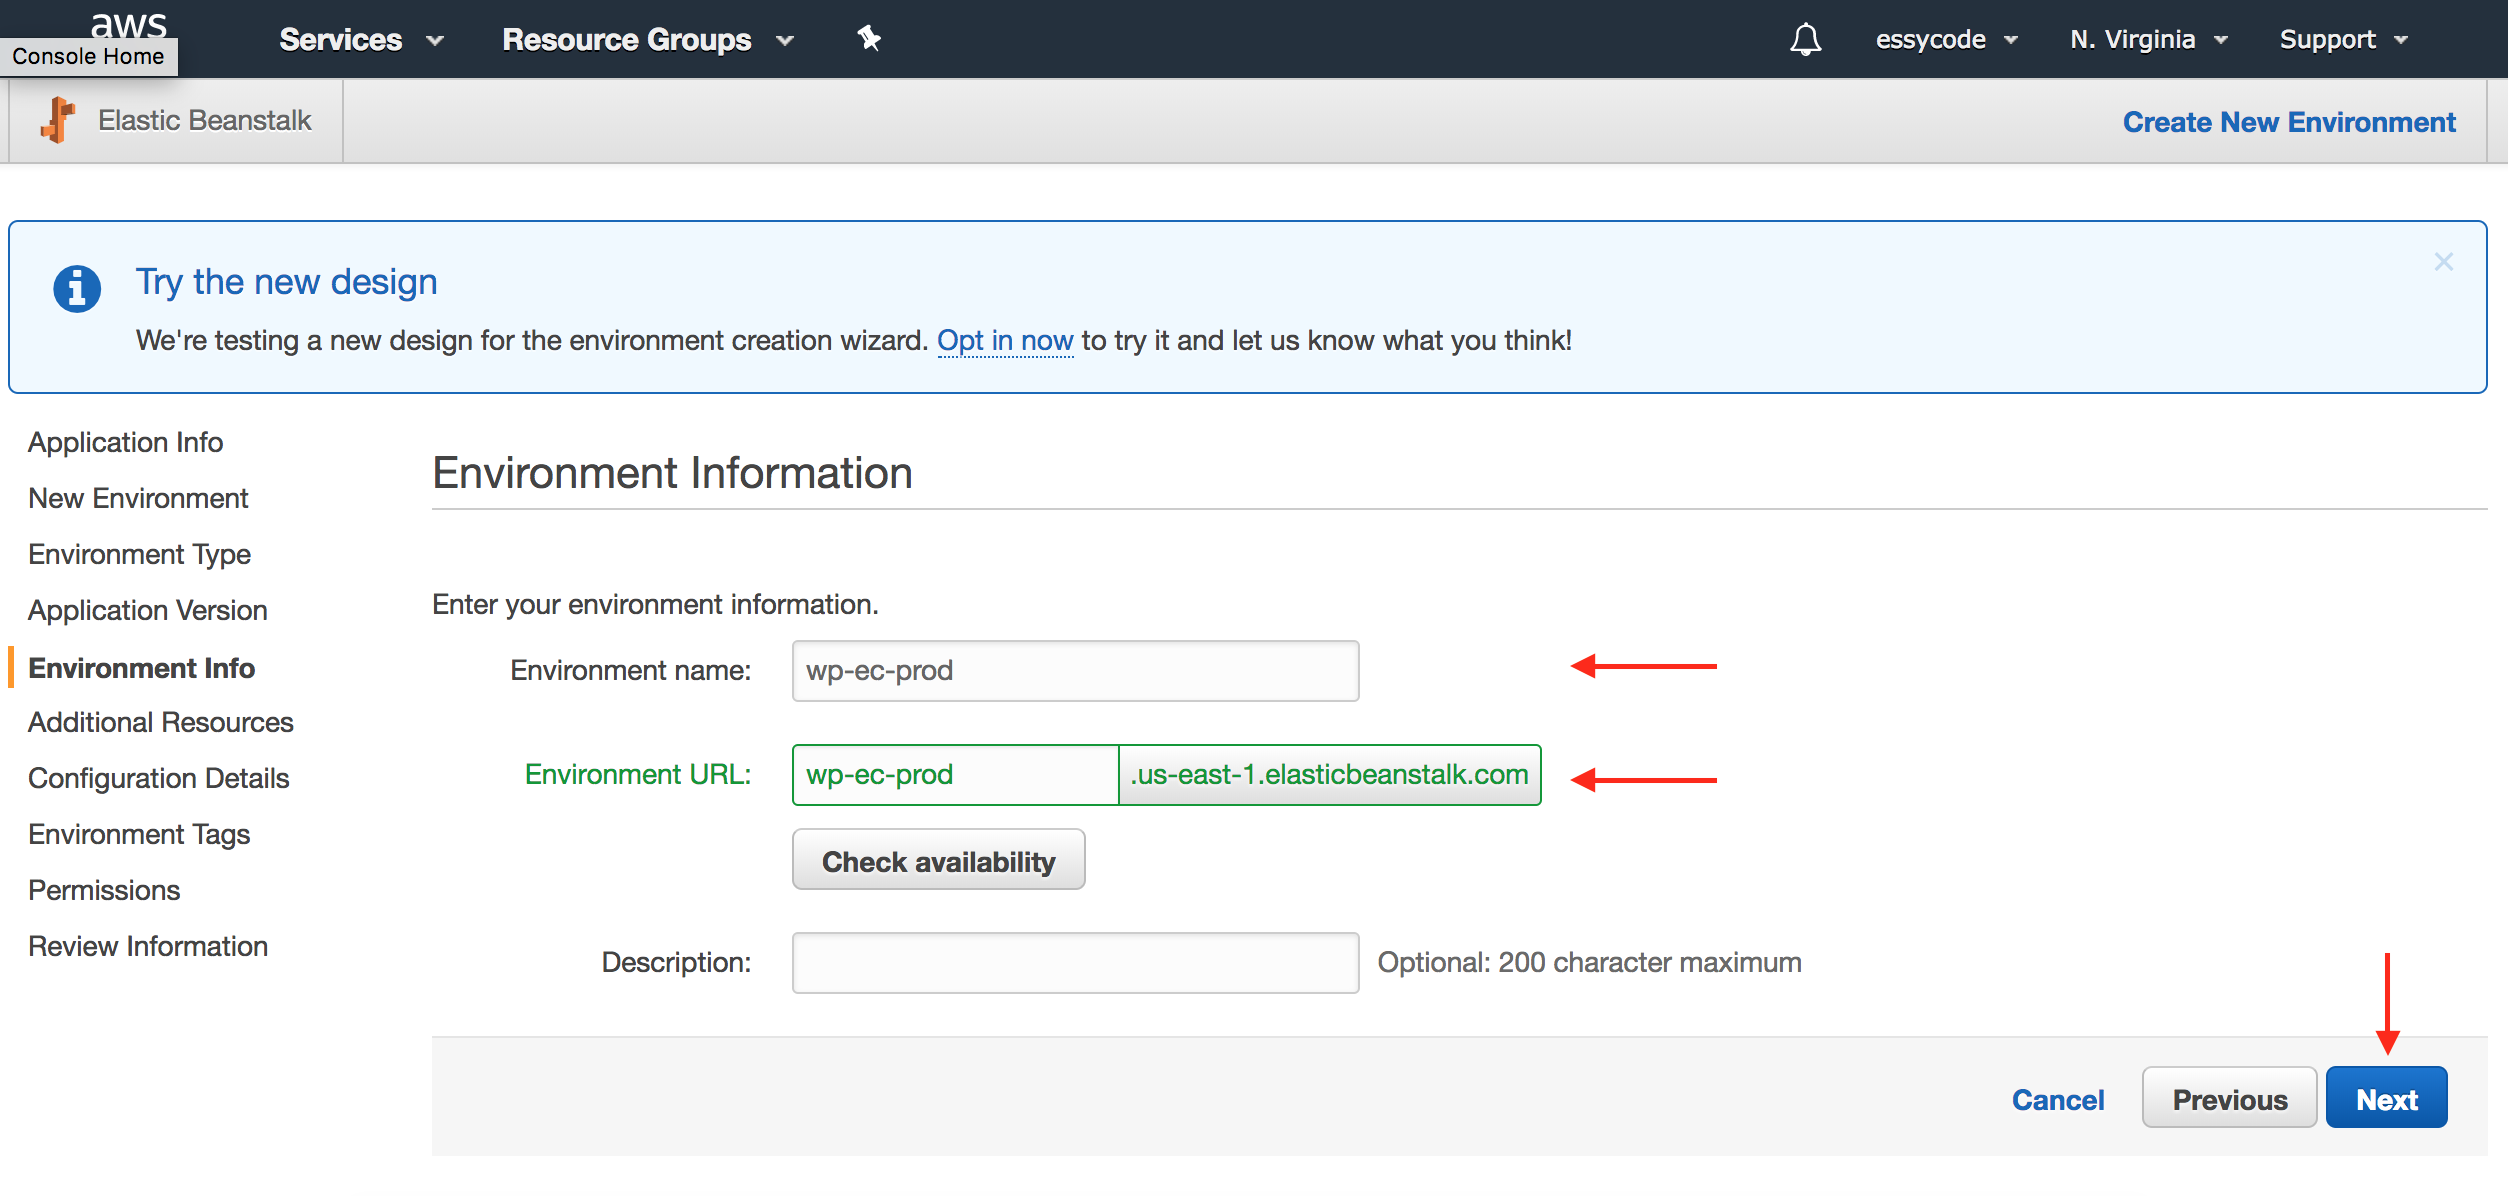
| Environment name | Enter a name for your environment. Can be anything. |
| Environment URL | Can be anything unique to AWS. |
| Click “Next” button. | |
Don’t select any additional resources for the environment. Click the “Next” button.
| Instance type | Choose t1.micro. As with the RDS configuration, you can choose a different tier depending on your use case. This selection is just to get an environment up and running. |
| EC2 key pair | You don’t have to select a key pair but it’s a good idea when in production so you can check in on your EC2 instances and tunnel into your RDS instance. Check out this link from AWS for more information on key pairs. |
| Leave the rest of the default values and click the “Next” button. | |
You don’t need to add any tags. Click the “Next” button.
Choose to let AWS create new roles for the instance profile and service role. Click the “Next” button.
Review your selections and click the “Launch” button. It will take a few minutes for the application to launch. You can continue to the next section while you’re waiting.
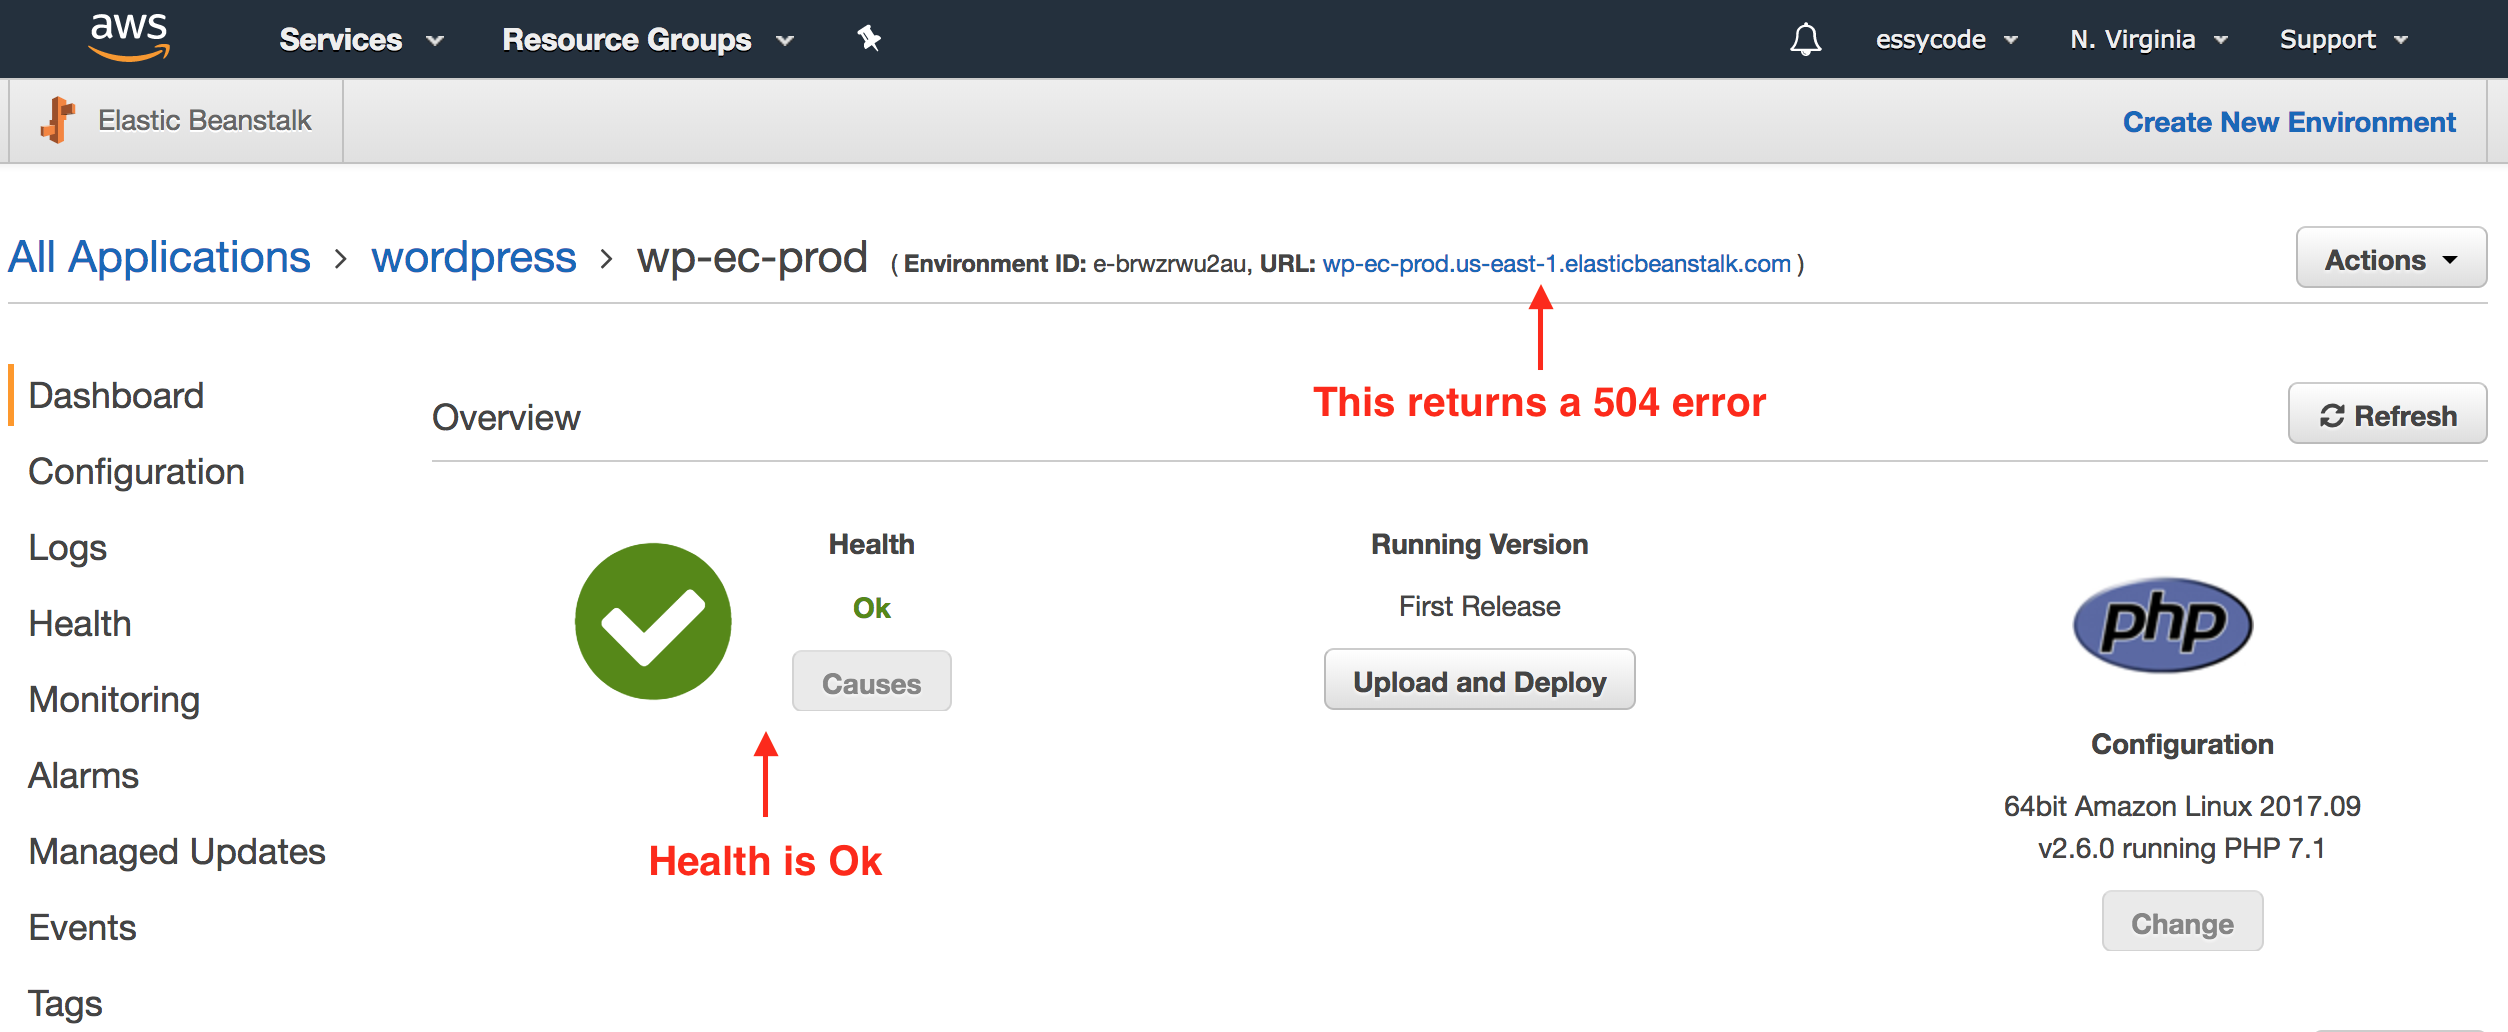
When your Elastic Beanstalk environment is ready you should see a health status of OK. But when you visit your application’s URL you should see a white page that takes a while to finally generate a 504 error . What’s happening is WordPress is trying to connect with your RDS instance but cannot, since the RDS instance is not publicly accessible and your Elastic Beanstalk instance is not in the same security group.
To fix this, we need to first tell the RDS security group to allow inbound connections and then add our Elastic Beanstalk instance to the RDS security group.
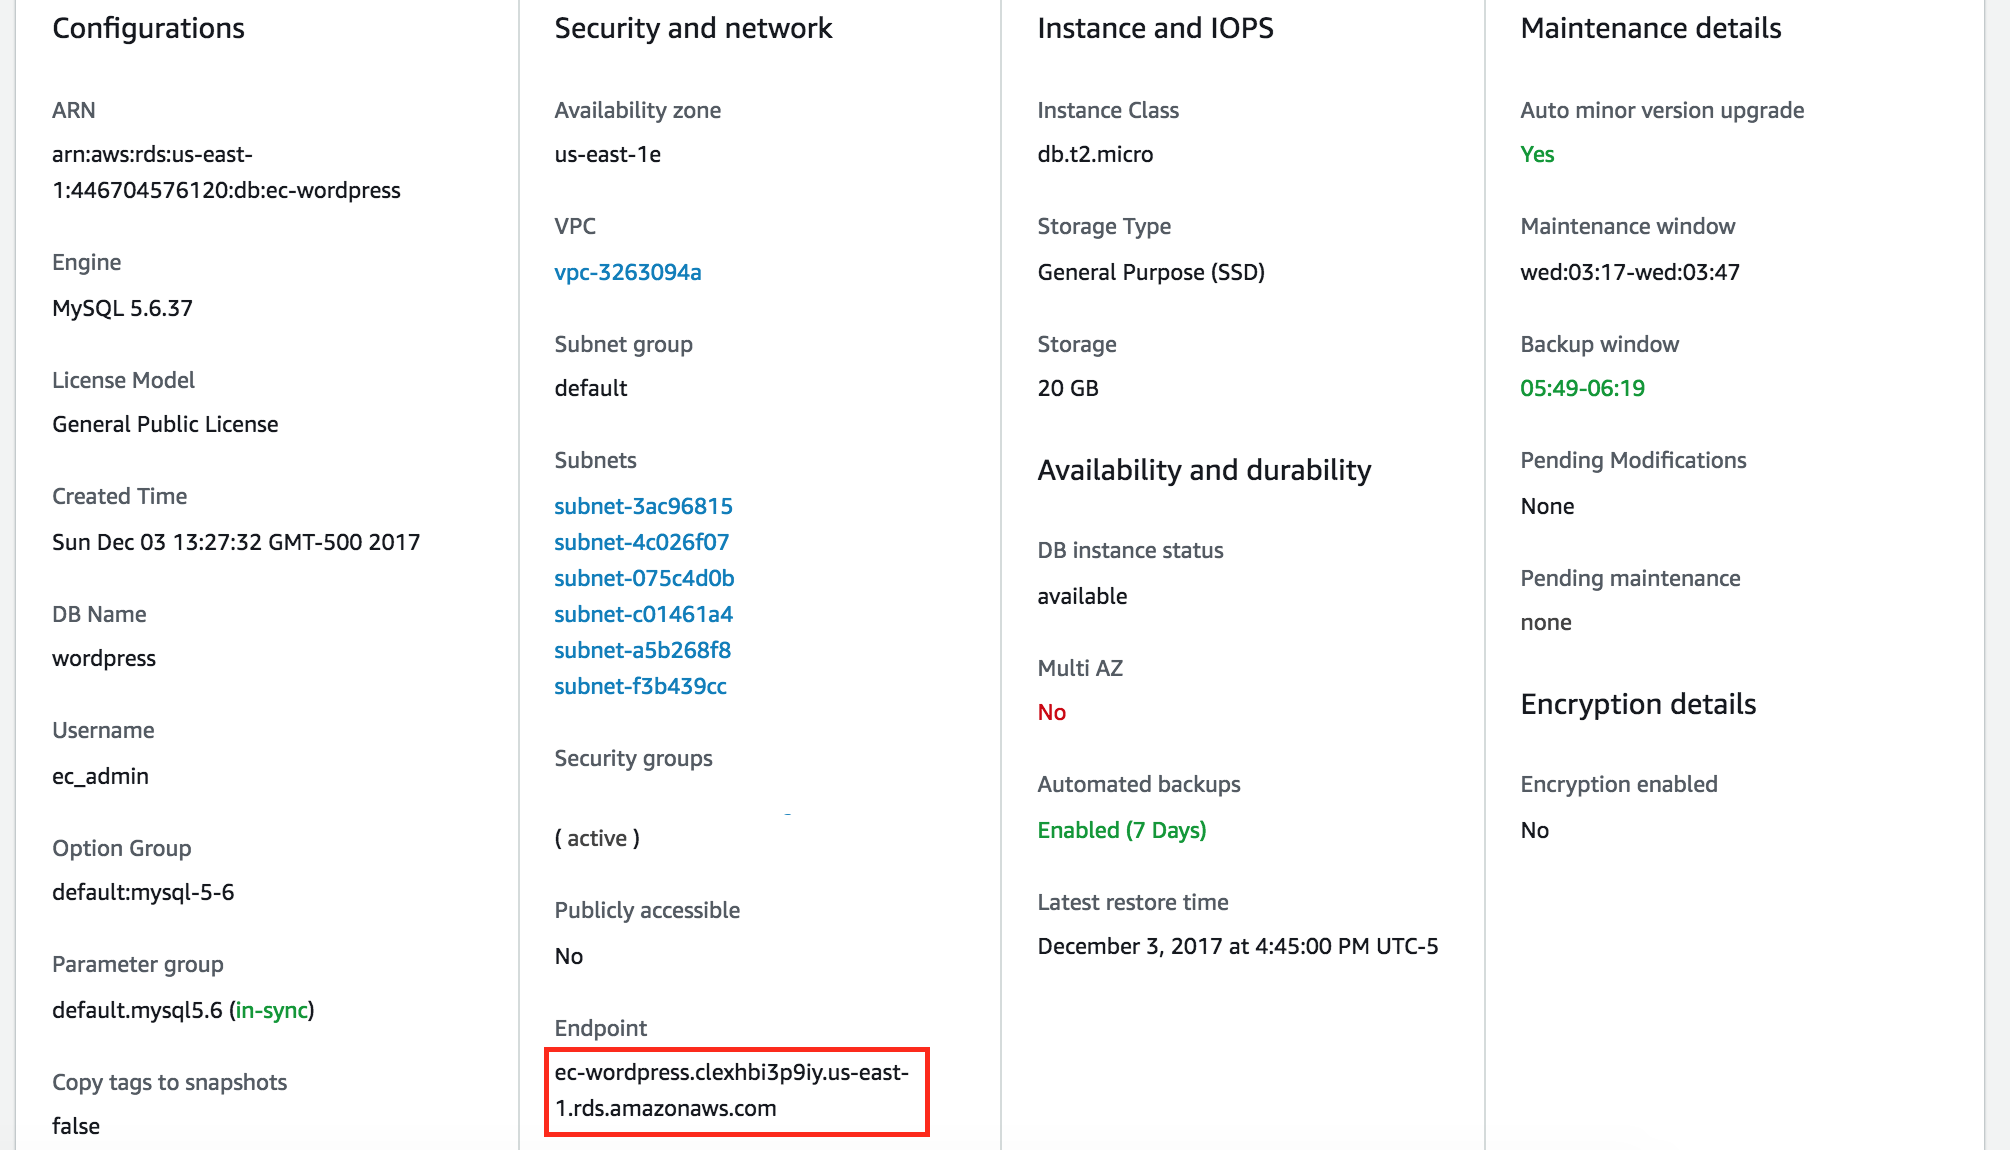
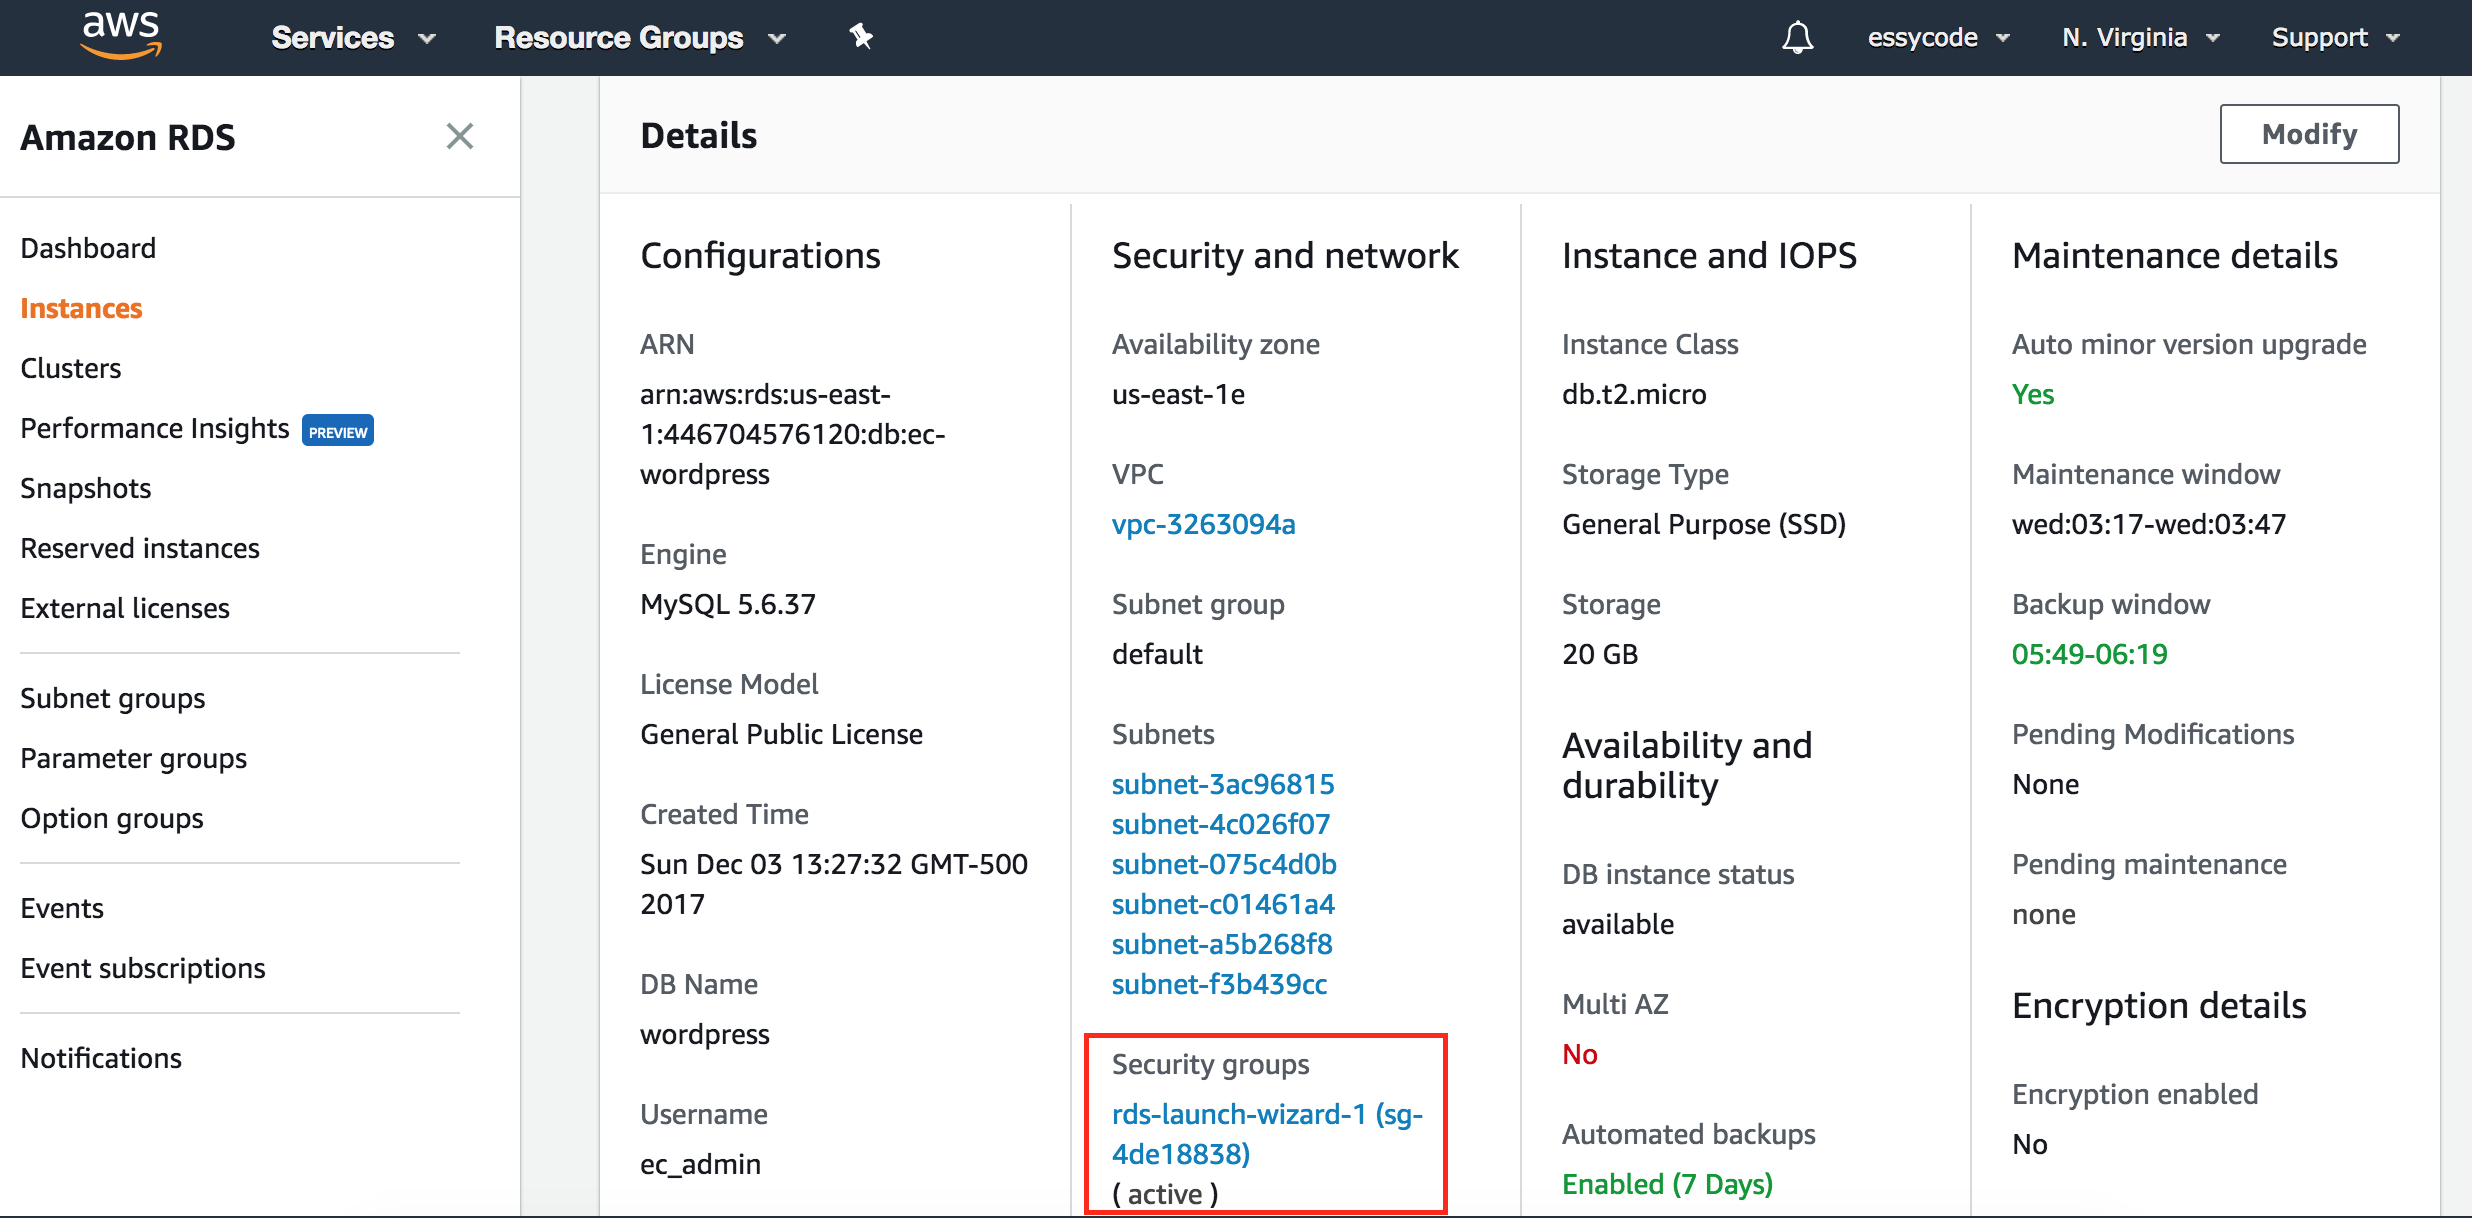
First, go to the RDS dashboard, click on “Instances” in the menu on the left, and select your instance. Scroll down to the “Details” section. Under “Security and Network” you’ll find the instance security groups. The security group should be named something like “rds-launch-wizard”. (Make a note of the name since we’ll have to enter it in a minute.) Click on the security group link to go to its settings page.
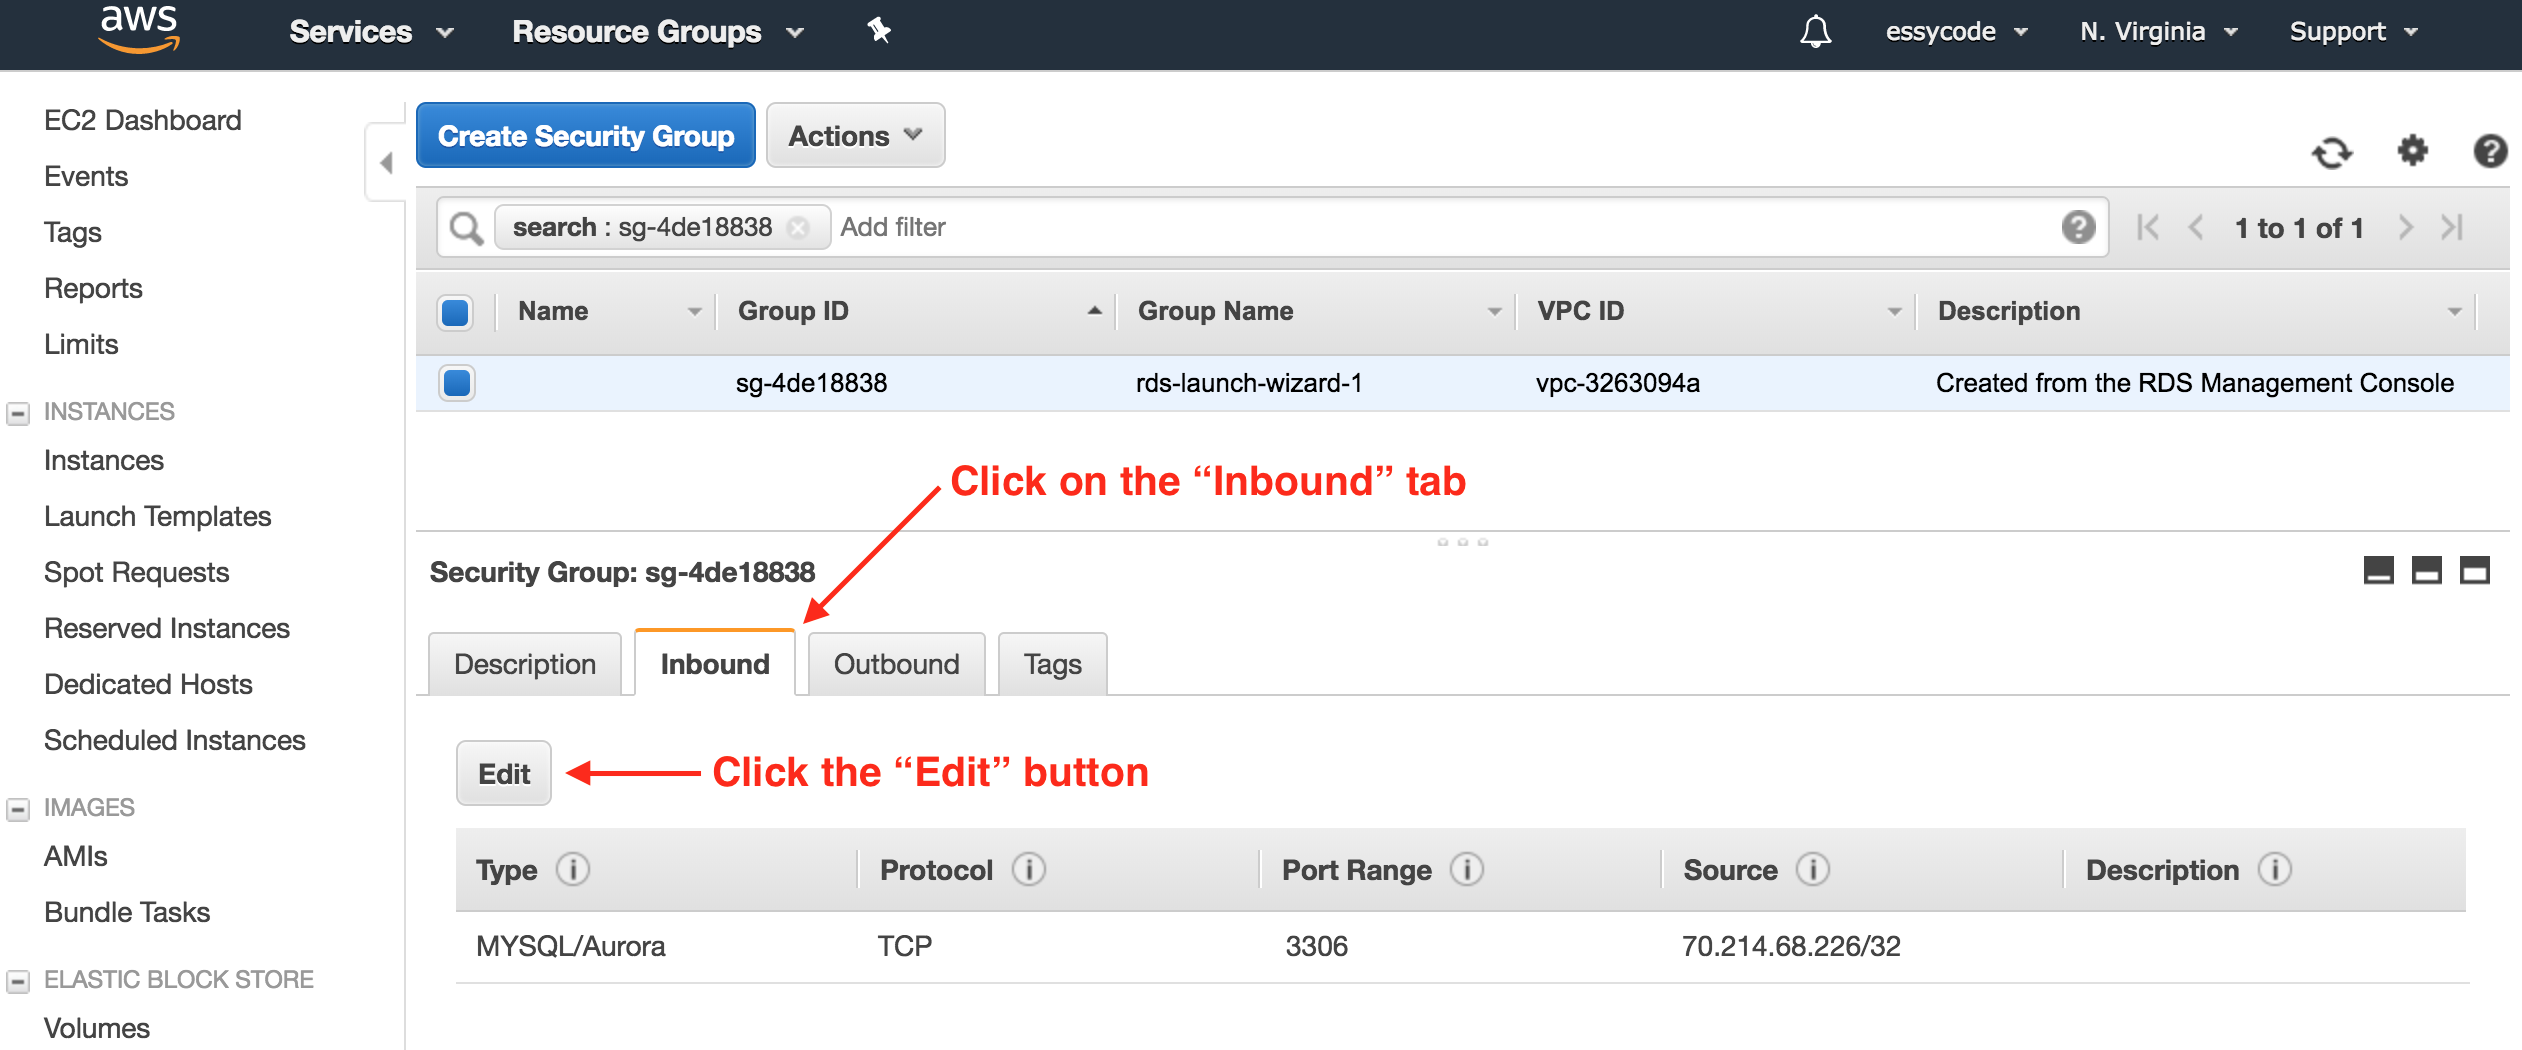
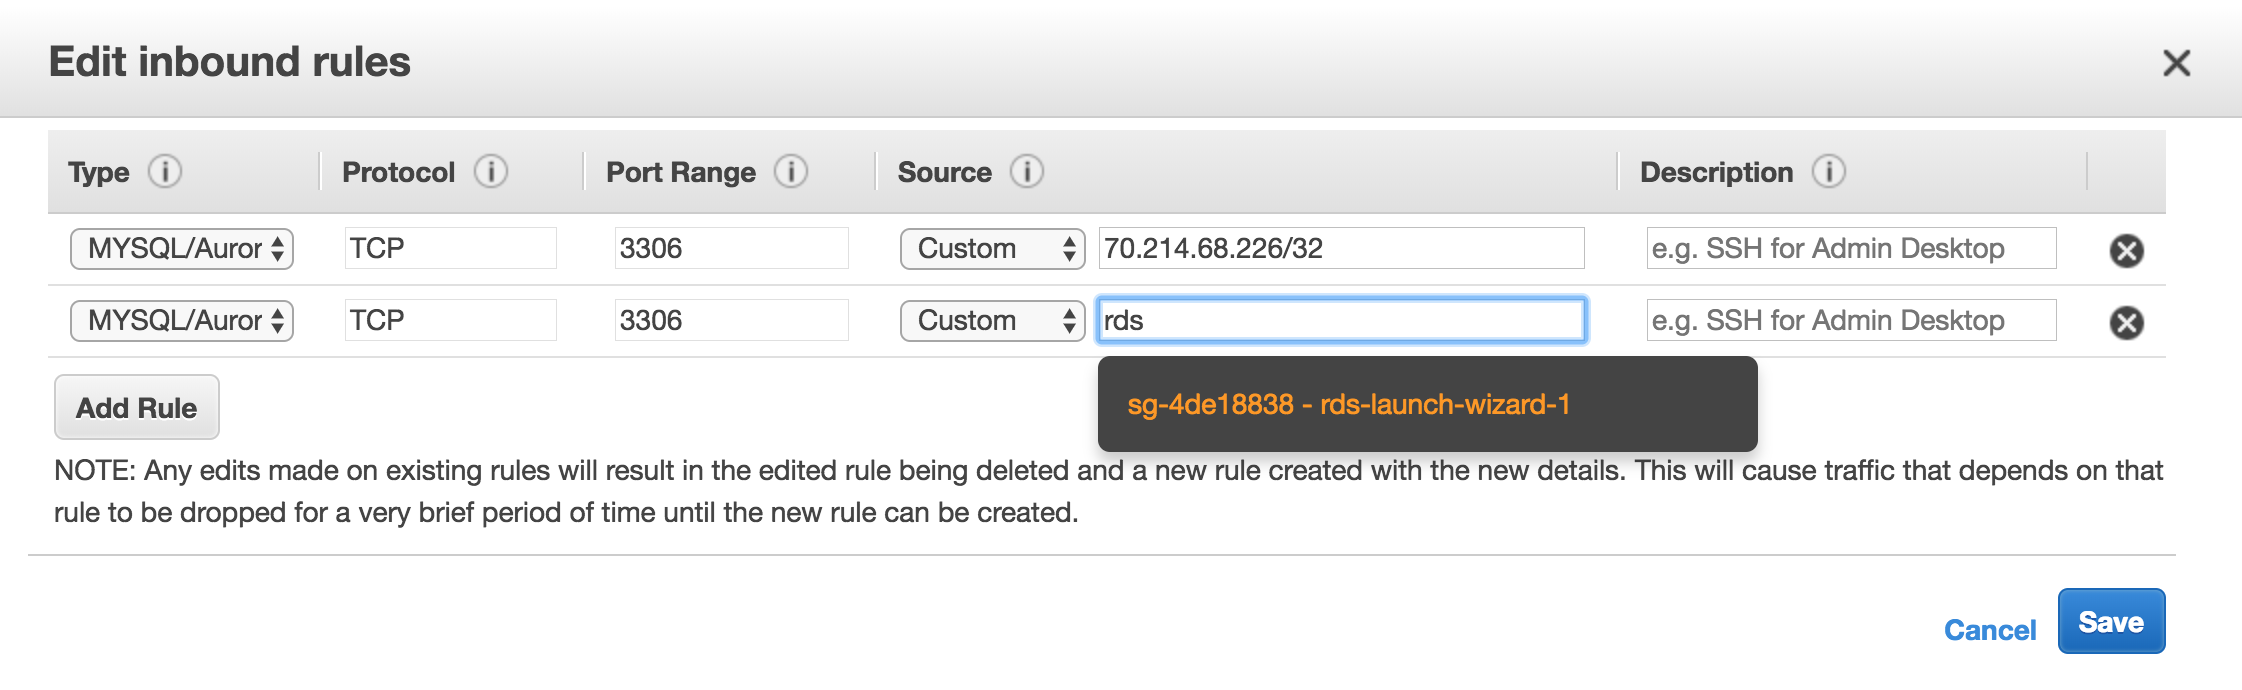
In the security group settings, click on the “Inbound” tab and click the “Edit” button. Add a new rule to allow members of the security group to access the database. Set the type to “MYSQL/Aurora”, the protocol to “TCP”, and the port range to “3306”. In the “source” field you can start typing the name of the security group (eg, “rds-launch-wizard”) to get an autocomplete field . Click the “Save” button.
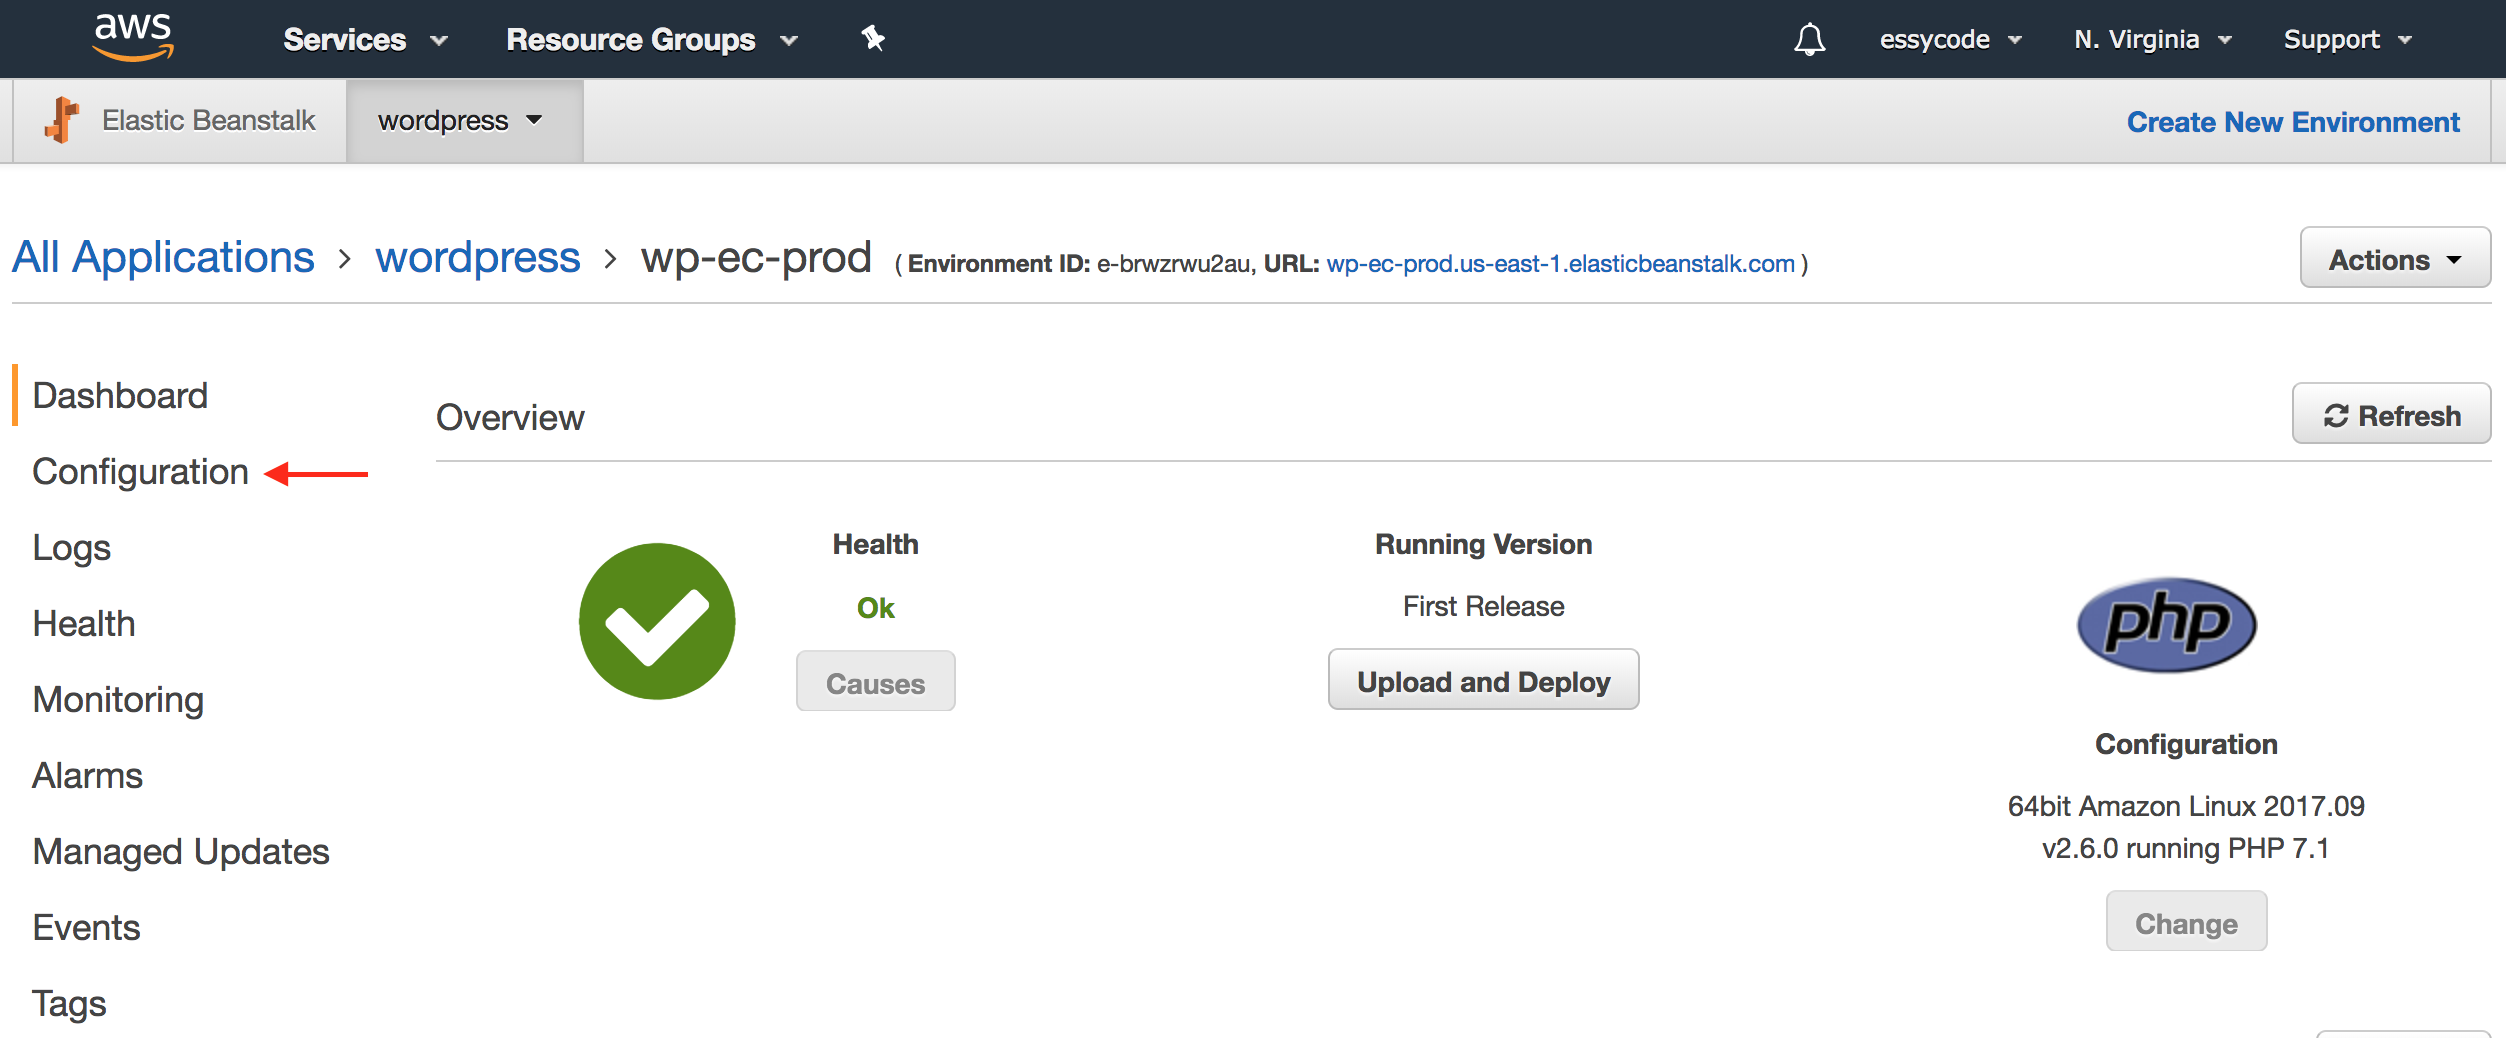
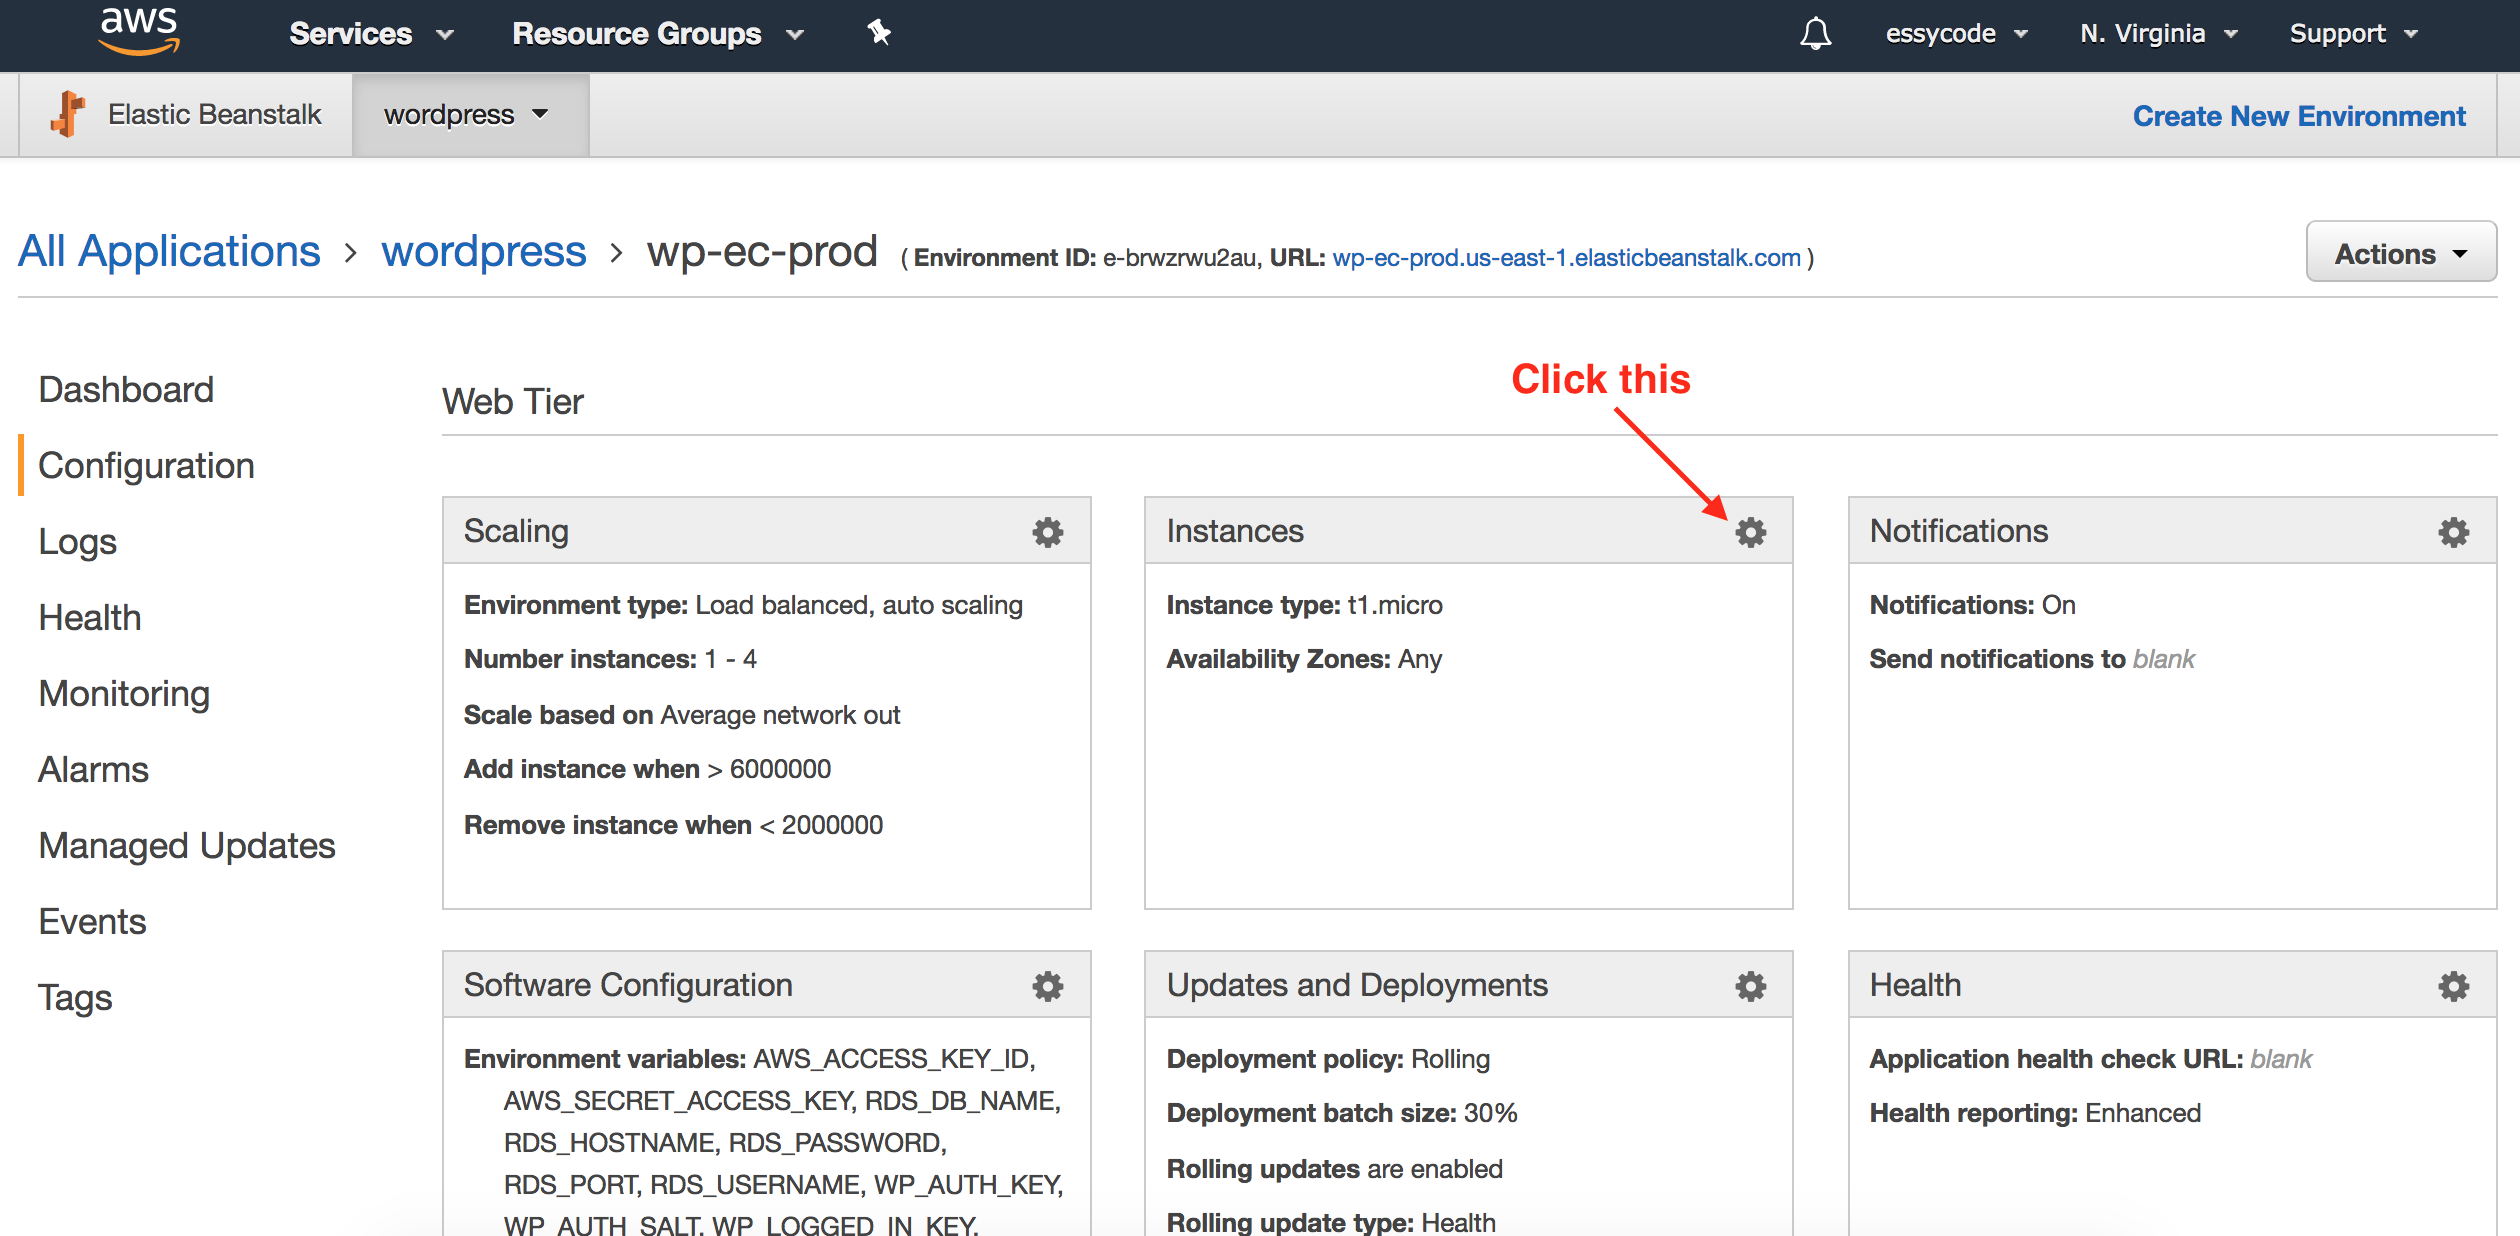
Now we have to add our Elastic Beanstalk environment to the security group. Go to the Elastic Beanstalk dashboard and click on your environment. Click on the “Configuration” link on the left . Click on the cog on the “Instances” panel .
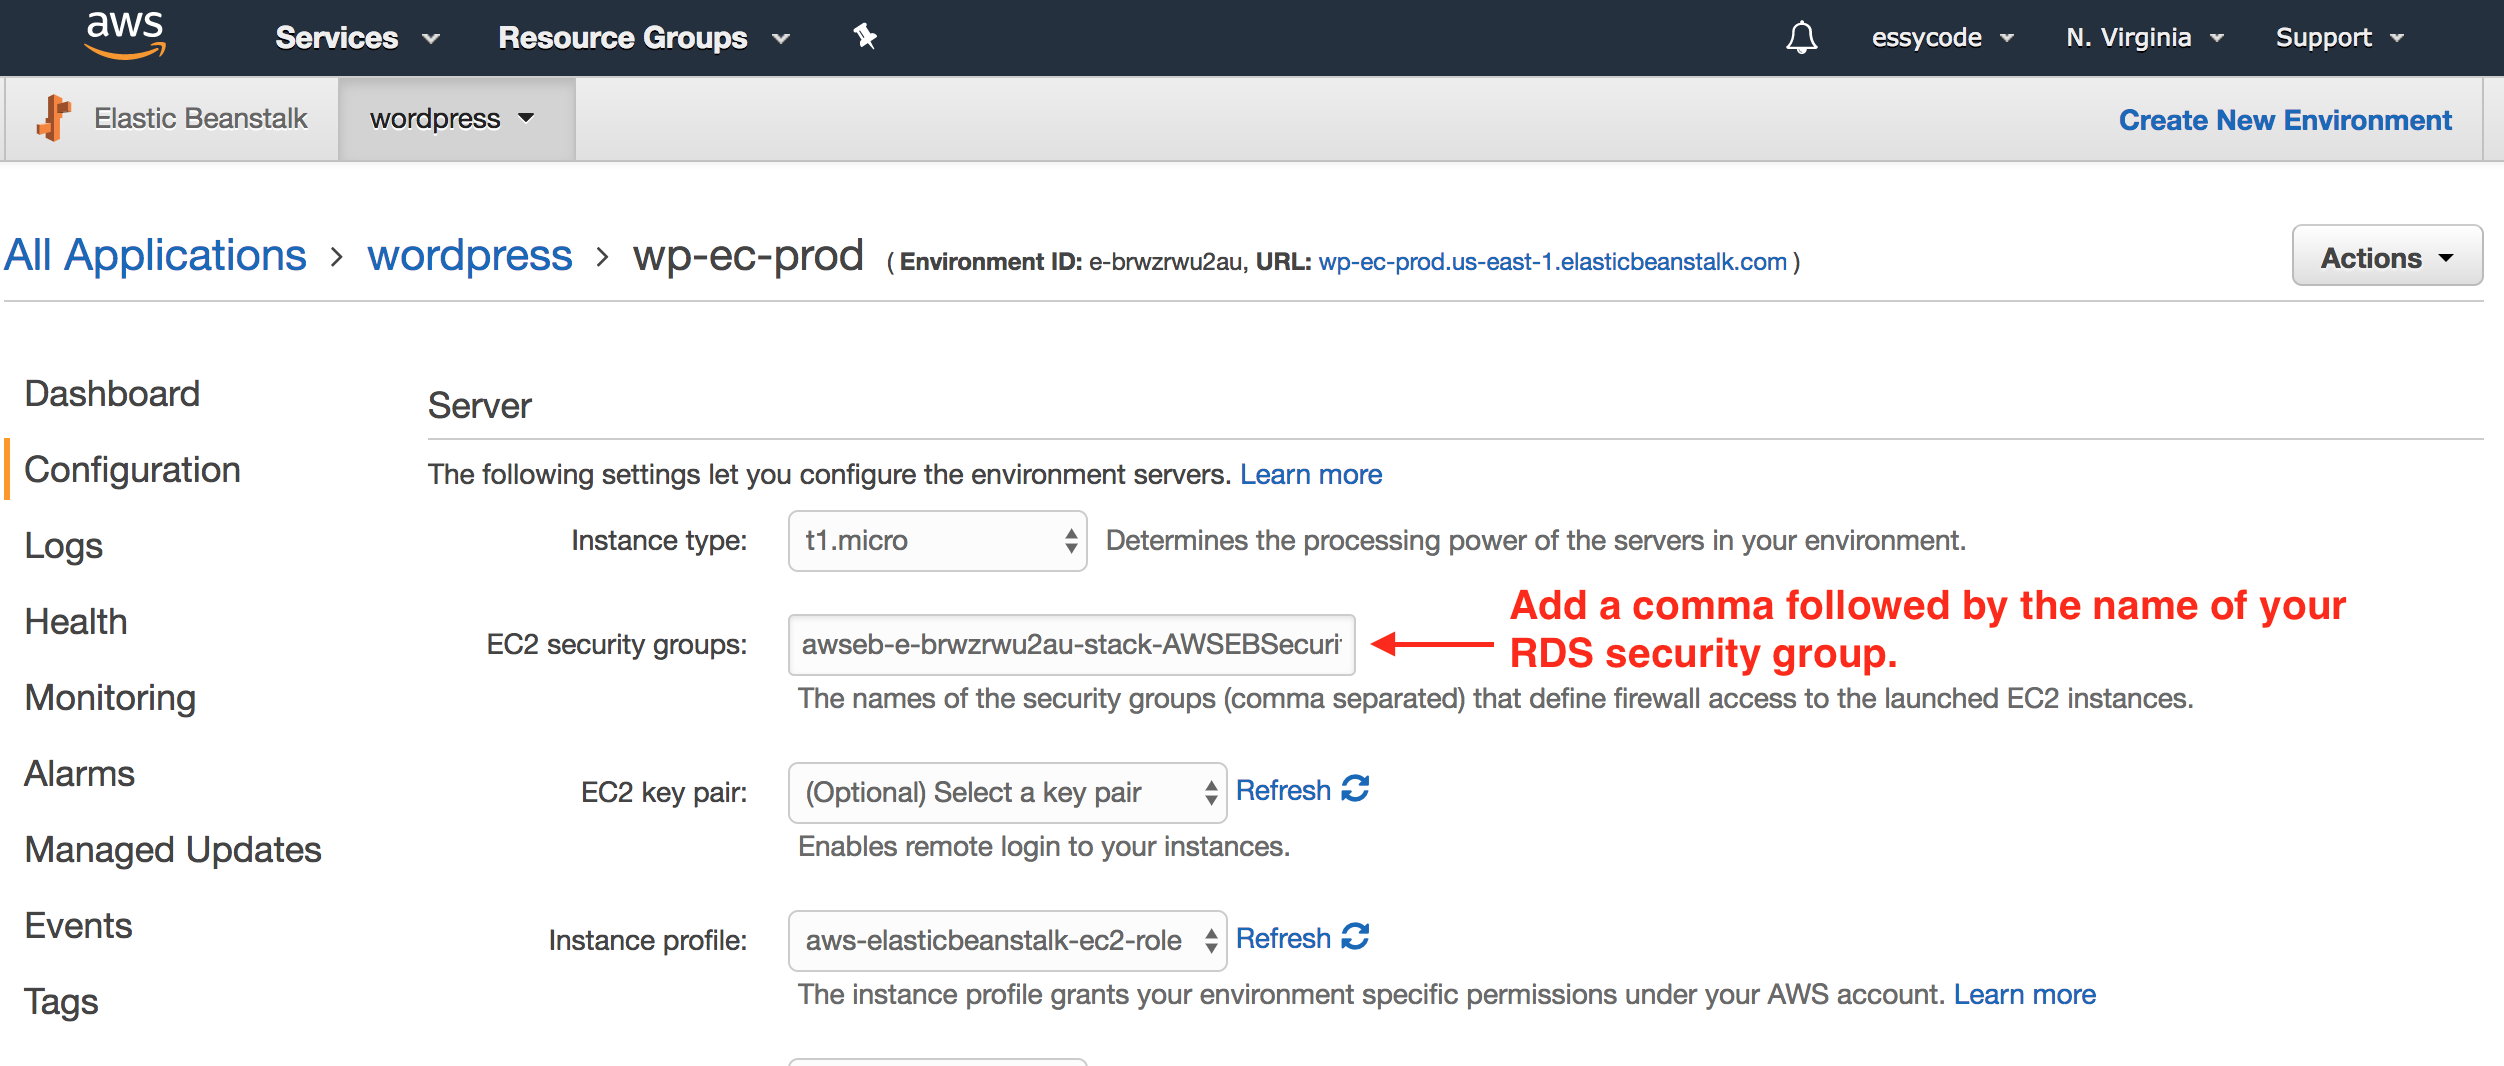
In the “EC2 security groups” field, add a comma and the name of your RDS security group . Scroll down and click the “Apply” button.
This will start an update to your environment that will take a few minutes.
Once your environment has restarted when you go to the site you should be guided through the WordPress installation. Note that you will not be asked to configure the database since that’s already been completed.
After completing the installation and logging in to the admin page, go to Plugins and activate first the Amazon Web Services plugin and then the WP Offload S3 plugin. Click on the WP Offload S3 settings link to point to your S3 bucket.
Check out the post Automating WordPress Deployment to Elastic Beanstalk to learn how to automate the build and deployment process. This will let you make changes to your local WordPress development environment and deploy a new application with a single command.
Hopefully all of the above worked and you’re off and running, but if not feel free to post questions in the comments section below.
Comments Leave a comment
Hi Arthur -
Thanks for the comment. Unfortunately I don't have a good answer for your question about keeping databases in sync -- in practice, any time I make a change via the admin pages that affects the database I have to make the same change both in my test or local environment and again in production. For plugins where you're just changing settings this isn't that big a deal and manageable. In other cases, however, such as with WooCommerce where you're changing products and recording transactions, I'll periodically clone the production database to my dev environment. In past I've set up scheduled (daily) tasks to automate the process. So in short, it depends on your use case but I don't have a good answer. Would love to hear from anyone else though!
Hi Nomi - Glad the post was helpful. I don't use S3 for plugins and themes but instead include them in a single source bundle that is deployed to Elastic Beanstalk. I think this is preferable to using S3 since you can have a single deployment and don't have to worry about S3 caching preventing changes from propagating.
You can actually see the build script for this site: https://github.com/essy2017/essy-code-build. So to deploy the site I run deploy.sh, which in turn calls build.sh, which bundles WordPress, my plugins, and theme into a single zip file that is deployed to Elastic Beanstalk. The build script does load a file config.txt that is not committed to source (since it includes information about my local filesystem). It defines a variable "theme_src" that points to my local theme directory. eg, theme_src=/../../wp-content/themes/mytheme. The plugins are included in the source (see /assets) but could also be handled in a similar fashion to the theme, ie, copied from somewhere in your local environment. Hopefully this helps but let me know if otherwise.
Hi, very nice post with clear explanation..While everything seems to make sense, i still got some errors...
Don't know if it's because of what you mention above==>>Note that backticks (`) in the values will cause Elastic Beanstalk to fail. Once you generate the keys and salts, replace any backtick marks with other characters.
This should be replaced by what exactly? Any character, wouldn't that make my the actual generated "Key" invalid??
Leave a comment